Showing posts with label Chocolate. Show all posts

Thursday, March 1, 2012

World Peace, One Cookie at a Time

 
I can't remember where I first heard about them, but cookbook author Dorie Greenspan has a recipe for these chocolate chip-studded chocolate sable cookies, and let me tell you: they are something.  They are so named because a friend of hers once said "in our house, we call them World Peace Cookies, because we're convinced that a daily dose of the cookies is all that's needed to ensure planetary peace and happiness."  I couldn't agree more.

Nearly two years ago I wrote about my ongoing quest for a chocolate cookie to satisfy my father's insatiable sweet tooth, and while these fit the bill in a very different way than most, they definitely do satisfy.  A sable cookie, much like shortbread, is a bit drier and has a sandy texture (sable literally means sand, en francais).  While it doesn't have that ooey-gooey texture that I'm usually after in my cookies, they are still quite soft despite their dryness.  Something about that makes them seem more sophisticated than your average super chocolatey cookie.  Plus, the best part is the satisfying hit of salt, which intensifies the flavor in an oh-so-amazing-and totally-addictive way.  So whip up a batch (they're quite quick), but remember that they do need time to set up in the fridge or freezer, so they're not ideal as a last-minute cookie.  However, they are a perfect prep-ahead cookie (see note at the bottom).

Tuesday, May 31, 2011

Everything and the Kitchen Sink Cookies

  
I just realized the other week that this blog is nearly two years old, and I still haven't told you about one of my favorite cookies ever.  Oops.  Sorry about that.  No, really, I am.

They come from Dorie Greenspan (adorable and so talented!), and can be found in her book Baking: From My Home to Yours.  I don't have the book, but at some point the recipe was published in a cooking magazine, which is where I discovered it.  (Judging from the font I'm going to say it was Bon Appetit, but I managed to trim away any real identifying details).  Dorie dubs these cookies, which are absolutely packed with oats, nuts, fruit, and chocolate, Chockablock cookies.  The type of nuts & fruit you use is entirely up to you, depending on what you have kicking around the pantry.  This time around I used dried cherries and apricots, pecans, and lots of chocolate, but I've tried lots of combos, all tasty and delicious.  My only minor change to the recipe is nixing the dried coconut (hate it!) and upping the oats and other add-ins to equal an extra half cup of stuff.  The cookie purists in your life might find these babies a little overwhelming, but if you like a cookie with a lot of flavor and texture, they are definitely worth a try.


Chockablock Cookies (From Baking: From My Home to Yours by Dorie Greenspan)
About 30 cookies

* 1 ½ cups all-purpose flour
* ¾ teaspoon baking powder
* ½ teaspoon baking soda
* ¼ teaspoon salt
* ½ stick (4 tablespoons/2 ounces) unsalted butter, at room temperature
* ¼ cup solid vegetable shortening (i.e., Crisco)
* ½ cup sugar
* ½ cup molasses (not blackstrap)
* 2 large eggs
* 1 ½ cups old-fashioned oats
* 1 cup coarsely chopped nuts (walnuts, pecans, almonds or peanuts are good)
* 1 cup coarsely chopped dried fruit (apricot and cherries are my faves, but I also love raisins, prunes, and cranberries, and I'd like to experiment with apple at some point)
* 12 ounces of bittersweet chocolate coarsely chopped, or about 2 cups of chocolate chips
* ½ cup unsweetened shredded coconut (or add an extra half cup of oats & fruit/nuts)

1. Place your oven racks in upper and lower thirds of the oven and preheat it to 325 degrees F.  Line two baking sheets with parchment paper or silicone baking mats.

2. In a medium bowl, whisk together the flour, baking powder, baking soda and salt.


3. Fit your stand mixer the paddle attachment if you have one, or with a hand mixer and a large bowl, beat together the butter and shortening until very smooth, about 2 minutes.  Add the sugar and beat two minutes more.  Add the molasses and beat for 1 minute more.  Add the eggs one at a time, beating for a minute after each addition. 

4. With the mixer on low, mix in the oats, then the dry ingredients, mixing just until they are incorporated.  Add the nuts, fruit, chocolate chips and coconut (if using), and pulse the mixer a few times to incorporate them (or just use a sturdy rubber spatula to fold them in).


(At this point, the dough can be refrigerated, covered in plastic, for two days.)


5. If you have a 2 tablespoon cookie scoop, that's a perfect size for these cookies.  If you don't, simply drop rounded tablespoons of dough onto the prepared pans, leaving about 1 ½ inches between the mounds.  Bake for 15 to 18 minutes, rotating pans from top to bottom and front to back at the midway point, until the cookies are just set.  (Because they are dark in color, it's hard to judge done-ness by the color.  When in doubt, underbake I always say!)  Remove the baking sheets to cooling racks and let the cookies rest on the sheets for at least 5 minutes before transferring them to racks to cool.  Cookies keep for about a week in an airtight container.  

Another do-ahead trick is to scoop the dough into mounds onto a cookie sheets and freeze them.  Once they're frozen solid, the mounds can be transferred to a freezer bag and kept for up to 2 months.  You can bake the cookies right out of the freezer, simply add a couple of minutes to the baking time.

Enjoy!

Tuesday, February 1, 2011

Best. Day. Ever. (Part 1)

 
Today was, as you might have guessed, the best day ever.  Sorry, I've been kind of slacking on the keeping you updated on what I'm doing in culinary school thing.  Truthfully, I'm usually exhausted at the end of the day, and then I have to do homework, and posting just takes me so long that I haven't been keeping up.  But today was so fantastic that I can't keep it to myself. 

So what did we do today?, you're probably wondering.

Answer: Eggs, Cheese, & Dairy.  Happy days.  I will just have to look back on this and remember today when we get to butchering, which will not be the best day.

So we started out by making sweet souffles (as opposed to savory).  Students chose between a Grand Marnier souffle or chocolate; I chose chocolate (obvi).  

 Before the oven

As a seasoned savory souffle maker, I found the process quite straight forward, but I will have to experiment and adapt the recipe a bit before I post it because its written in "cooking school" quantities--i.e., more than you would ever make at home.  However, both the chocolate souffle and Grand Marnier Souffle were great, particularly the Grand Marnier, as it turned out (I think the chocolate souffle needs more chocolate...or at least that's one chocoholic's opinion!)

 My baby coming out of the oven


Digging in

Next: Eggs.  First we watched Chef John demonstrate about eight different ways to prepare eggs, all beautiful and delicious. 

Chef John shows us how it's done

The most interesting to me were shirred eggs, which were eggs cracked into a ramekin filled with pieces of thinly sliced meat (I think it was ham?), dobbed with (lots of) butter, then baked until the eggs were adequately set.  There was so much going on while he was demonstrating that I don't know exactly how long or what temperature, but if I had to guess I'd say about 8 minutes at 375 or 400?  I will have to get back to you on the details of this.  

Shirred Eggs

He also did an individual leek, goat cheese and pesto frittata, which was awesome, and demonstrated both French and American style omelets, which are actually quite different.

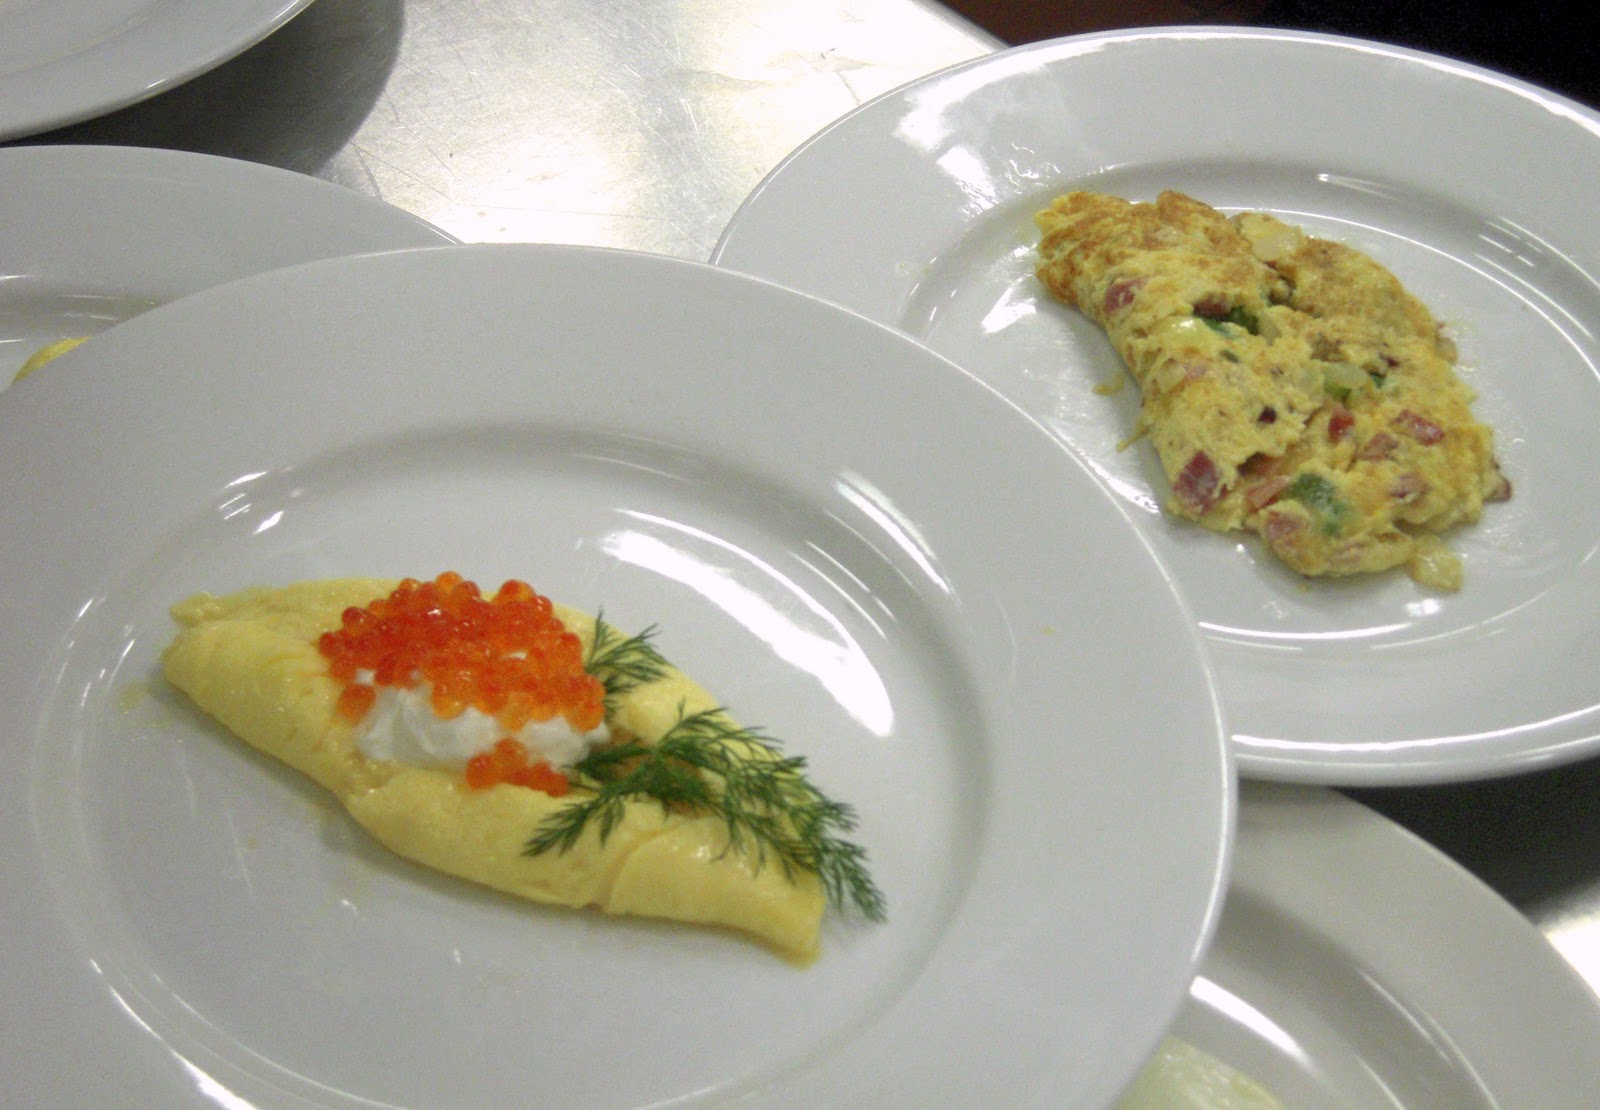
 French omelet with sour cream and caviar (left); American "Denver" omelet (right)

The most interesting thing besides the shirred eggs was a French style dessert omelet, which was just your basic French omelet (I can't do it justice here, you really just need to see someone doing it, but basically you start out in a pan over medium heat, add 2 beaten eggs, then move them around with a spatula almost like you're scrambling the egg, then , when it's mostly set, you leave it alone (except a little bit of jiggling to make sure it isn't sticking or browning), until it's totally set, then you fold one third over, and as you slide it out of the pan you fold the other third over, so the top is nice and smooth.  So once John made a perfect French omelet he filled it with apricot jam before folding it, and sprinkled it with confectioner's sugar, then he took a hot metal skewer (that he had stuck in the gas burner for a minute) and seared three diagonal lines through the sugar.  Beautiful and delicious!  It had never occurred to me to do a sweet omelet, but it was delish :)  

Sweet apricot filled omelet

 The egg dishes multiply faster than bunnies

After John whipped out all these beautiful egg dishes, we set to perfecting our own eggs.  After three takes I produced one decent French omelet, and I also practiced my scrambled eggs (although to be honest, I think I'm already pretty good at those--they are my fave), and then I practiced my over easies, including flipping them with just (several) flick(s) of my wrist.  Here's what I can tell you about flipping eggs using just your wrist: "Don't be afraid!" (in your best Julia Child voice).  And do it over the sink, just in case you miss (but "never apologize!").  My first one I did over too high heat, and it got too crispy and brown, but my second one was quite pretty.  The biggest take away lessons from all of this egg frying/scrambling/omeleting/frittata-ing?  

A sampling of my egg dishes: Over medium, scrambled, and 3 attempts 
at French omelets, getting progressively better from right to left

1. Use the right size pan.  (We were doing all of these individually, in 6 or 7-inch pans, like you would at an upscale restaurant). 

2. Make sure the pan is ridiculously non-stick and/or well seasoned

3. Only cook over moderate heat--browning isn't ideal, except for some American-style omelets

4. Clarified butter.  And lots of it.  (See pic of John, above.  That measuring cup of yellow stuff--butter.)  Clarified butter is regular butter without the milk solids.  To make it you can either melt a hunk of butter gently, then let the milk solids (the white part), sink to the bottom, then skim off from the top.  The part you want to use is the very clear and pure yellow part.  It is ideal for eggs because it doesn't brown or smoke, so it's forgiving if you overheat your pan, and all that jazz.  You can make your own by melting like, a pound of butter then letting the white parts sink and skimming off the yellow part (we go through it like water in cooking class, so we're making our own, often).  Alternatively, you can find in ethnic markets and better supermarkets as ghee, aka, Indian clarified butter.

Ooh, and I poached the most beautiful egg ever, and made it into an egg Benedict sandwich, which was fantastic.  If you are like the old me (before I learned how to poach eggs), you probably don't like poaching eggs, because they get all runny and weird in the water.  But, I found out how to do it well, and I have to say, my first egg was even prettier than Chef John's. So, here are the tricks:

Egg Benedict.  I was so excited I bit into it before I took the picture. 
Sorry.  That black thing on top is a truffle.  Seriously fancy here, people.

1. For every quart of poaching water, you add 1/4 cup of white vinegar.  This sounds like a lot, but it's not, and it's crucial, (you won't even taste it--promise).  DON'T put any salt in your water, it will make the whites run.

2. If you're not using the poached eggs right away, have a bowl of iced salted water set up.  When your eggs are doing cooking, transfer them into the cold water, which will stop the cooking and keep then moist.

3. Pre-crack your eggs into a teacup or other small vessel and use it to slip the egg into the water.  This way it will go in as one whole blob, and you'll avoid having too much "spread" of the whites.

4. Use extremely fresh Grade A eggs--these are the firmest--again, less spread.

5.  Use poaching water that is simmering, just on the verge of a boil.  Barely simmering water isn't quite hot enough, and boiling water will disrupt the eggs.

6. Timing--Most people like eggs poached between 2 1/2 and 3 minutes.  If you are poaching multiple eggs in the same pot, add 10 seconds per egg for each one in the pot (ex., if you're poaching 4 "2 1/2" minute eggs, total cooking time should be about 3 minutes, because you add 10 seconds for each additional egg).  Being the yolk-hating weirdo that I am, I prefer my egg poached closer to 5 minutes, but if you follow the first guidelines--vinegar in the water, proper simmering temp, and pre-cracking your eggs--no matter how long you cook them, they should come out well. 

If your whites do end up spreading a lot, it's totally acceptable to trim up the whites to make them look prettier--or not, whatevs.  I won't judge if you like to quantity over looks.  

So, yeah, that's a lot about eggs.  I probably ate at least half a dozen today.  Good thing I don't have a cholesterol problem (yet).  Hopefully a few of these tricks will help you next time you need to cook an egg, and when I get some more specifics on the souffles, you will be the first to know, I promise!

Stay tuned for part 2 of BEST DAY EVER: Wine and Cheese pairing.  Heaven!


Saturday, December 25, 2010

Never Too Late For Christmas Cookies

 
Hello December, goodbye December.  Well, maybe not goodbye just yet, but wow, only a week left?  That went fast!  Here's what I've been doing this December: Not cooking.  Packing.  Moving.  Unpacking.  Eating catered food.  Way too much of it.  More not cooking.  Unwrapping a ridiculous number of new cookbooks(!!!).  Here's what I'll be doing very soon: Cooking!  And blogging again!  And joining a gym.  I need that right about now. 

Probably a number of you know this, but I'll fill in those who don't.  I finished my gardening job, left Nantucket (*tear) last Monday.  Moved back in with the 'rents in Boston.  Why? you ask.  Well, I'll tell you: Starting culinary school in January!  Blogging has fallen by the wayside these past three weeks due to the packing and moving and holiday parties, not to mention many late-night Christmas hat knitting sessions/Jane Austen movie marathons that often occur for me right before the holidays.  And even if I had had time to write, I didn't think you'd care to hear about the multiple nights of scrambled eggs and salsa for dinner, or any of the other bizarre food combos I came up while attempting to only eat out of my pantry to minimize the amount of stuff I had to move.

Then I got home, and even thought I left about 5/6ths of my stuff in boxes in my parents' garage, it took a full 2 days to unpack the remaining 1/6, with ample breaks for Christmas cookie baking.  Which, let's be honest: was a lot more fun that the unpacking part. 

Every year I bake the cookies for my family's Christmas party.  I've tried different kinds of cookies over the years, which have mostly been good, but generally too plentiful.  So this year I decided to go minimal (only 3 kinds instead of 4 or 5), and I actually returned to 2 favorite cookies that I had made in years past, in part because they are good enough to warrant revisiting, but mostly because I've been too busy justify spending time searching out new recipes.  Incidentally, the 2 cookies that I returned to were 2 that I had made the first year my parents lived in their new condo, aka, the year that everything I attempted to bake was a disaster.  I remember sending my friend Liz of Baked By Liz an email that year, detailing all of my frustrations with the new kitchen, which basically went something like this:

....The ovens are tiny, I had to buy all new mini cookie sheets, I can only bake one batch of cookies at a time, and if I try to use both ovens at once (they are double ovens), all hell breaks loose.  One runs way hot, the other runs way cold, and everything either turns out rock hard, or else never bakes.  I had to throw out dozens and dozens of cookies, and a cake, and start again from scratch, this time with oven thermometers....which have helped, slightly.

Luckily, this being the 3rd holiday season in the not-as-new-anymore condo, I have gotten slightly better at the ovens.  Here's the trick: OVEN THERMOMETERS!  Have I sung their praises lately?  Also, accepting the fact that the ovens misbehave terribly when both are on at the same time, accepting that you can only reliably use one at a time, and since they are the smallest ovens you will ever see, realizing you can only bake about 10 cookies at once.  Which, when you're baking for a party of 60 people...can take a while.  So never try to do anything quickly.  My game plan was to make the three cookies doughs at night, and then roll and bake the cookies the following day, when I had ample time to do so.  Incidentally all 3 cookies that I chose were ones with doughs that took well to refrigeration (and in the case of one, actually required it).  They all get rolled into shape, dipped into sugars, and then baked, although I didn't even notice the similarities in their methods until I was well underway.  A few cookies in I decided that it would be more efficient to weigh out each cookie, which sounds completely compulsive, and probably is, but actually was a lot easier than trying to eyeball their sizes.  I set my electric scale to grams, which is the smallest increment, and decided, after weighing a few dough balls, that 20 grams was an ideal weight for each cookie.  After a few, I was actually scooping out pieces of dough that were nearly perfect, but it was nice not to have to even them out at the end, taking a little pinch of dough off one and adding it to another.  I liked the peace of mind, knowing they were all identical so that they would all look the same, and bake up perfectly; in the future I will always use this technique.

So now that I've told you at length about how the cookies were make and weighed and baked, perhaps I should tell you what they actually are, before Christmas is over (2 hours, I can do this!). 

In perceived order of popularity (based on how many of each were left after the party):

3rd place:  Molasses Gingerbread Cookies

2nd place: Espresso Crinkles

1st place: Mexican Wedding Cookies

Incidentally, the fewer the ingredients, the more popular the cookie.  Although I suspect my completely unscientific observations were thrown off by the fact that the gingerbread ones were in the room where fewer guests were mingling, whereas the other two were in the room where about 90% of the guests were mingling.  Just a guess.  But in my opinion, all were delicious and all will be made again.  And so, without further ado, the recipes. 


Molasses Gingerbread Cookies (Adapted, only slightly, from the Whole Foods website)
Makes about 30 cookies

* 2 1/4 cups all purpose flour
* 2 teaspoons baking soda
* 1/2 teaspoon salt
* 1 1/2 teaspoons ground cinnamon
* 1 teaspoon ground ginger
* 3/4 teaspoon ground cloves
* 3/4 teaspoon allspice
* 3/4 cup (1 1/2 sticks) unsalted butter, at room temperature
* 1/2 cup packed brown sugar
* 1/2 cup plus 1/3 cup granulated sugar 
* 1 egg
* 1 teaspoon vanilla extract
* 1/3 cup unsulphured molasses
* Zest of 1 orange


1. Preheat oven to 375°F. In medium bowl, whisk together flour, baking soda, salt, cinnamon, ginger, cloves and allspice; set aside.

2. In a large bowl, cream together butter, brown sugar and 1/2 cup of the granulated sugar with an electric mixer on medium speed until light and fluffy, scraping down sides of bowl with a rubber spatula. Add egg, vanilla and molasses and beat until combined. While continuing to beat on low speed, add flour mixture and beat just until combined. 

Ali creams the butter and sugar together in style


3. Combine the remaining 1/3 cup granulated sugar and orange zest in a shallow bowl. To form each cookie, roll a scant 2 tablespoons of the dough into a 1 1/4-inch ball, (If you have an electronic scale, 20 grams is an ideal weight for each cookie).  Then roll in sugar mixture and transfer to ungreased baking sheets (lined with parchment paper, if you have it) spacing cookies about 2 inches apart. 

4. Bake until outer edges begin to set and centers are soft and puffy, 9 to 11 minutes. Cool for 2 to 3 minutes, then transfer to cooling racks and set aside to let cool completely.  Store in airtight containers if you're not serving these right away, to maintain softness.  


Espresso Crinkles (Adapted, only slightly, from Cooking Light, December 2008)
Makes about 24 cookies

My only real change to these cookies is to melt the chocolate in a mixing bowl over a double boiler instead of in a sauce pan and then transferring it to a bowl, thereby saving one dirty dish.  I also used a whole egg instead of 2 egg whiles--a little fattier, but less waste.  Either way is fine, though.  My only other tip is to make sure you don't over-bake them--at their best they are soft and chewy inside, just like a dense, fudge-y brownie.  Delish!

* 4.5 ounces all-purpose flour (about 1 cup)
* 1 1/4 cups powdered sugar, divided
* 1/4 cup unsweetened cocoa
* 1 1/4 teaspoons baking powder
* 1/8 teaspoon salt
* 5 1/4 teaspoons canola oil
* 1 1/2 ounces unsweetened chocolate, chopped
* 1 teaspoon instant espresso granules
* 3/4 cup packed brown sugar
* 3 tablespoons light-colored corn syrup
* 1 1/2 teaspoons vanilla extract
* 1 large egg or 2 large egg whites

1. Weigh or lightly spoon flour into dry measuring cups; level with a knife.  Sift together flour, 3/4 of a cup of powdered sugar, cocoa, baking powder, and salt in a medium bowl.

2. Combine oil and chocolate in a glass or metal bowl and set up a double boiler over a small saucepan over low heat; heat until chocolate melts, stirring constantly. Add espresso granules to pan; stir until blended. Remove from heat and allow chocolate mixture to cool 5 minutes. Stir in brown sugar, syrup, and vanilla. Add egg or egg whites, stirring with a whisk. Add flour mixture to egg mixture, stirring gently just until combined. Cover; chill at least 2 hours or overnight.

3. Preheat oven to 350° F.

Arranging the Espresso Crinkles...not in style.

 \4. Roll dough into 1-inch balls (If you have an electronic scale, 20 grams is an ideal weight for the dough balls).  Dredge balls in remaining 1/2 cup powdered sugar; place balls 2 inches apart on 2 baking sheets lined with parchment paper. Bake at 350° for 10 minutes or until tops are cracked and almost set. Cool cookies on pan 2 minutes or until set; remove from pan. Cool cookies on a wire rack.

Espresso Crinkles, waiting to go into the oven


Mexican Wedding Cookies (From Paula Deen, of the Food Network)
Makes about 3 dozen cookies

These incredibly simple cookies are divine as they crumble gently when you bite into them then melt on your tongue.  Five ingredients have never come together so beautifully before, let me assure you!  A mini Cuisinart is an ideal tool for chopping the pecans, but you can also do it with a nice big knife if that's all you have. 


* 1 cup (2 sticks) unsalted butter, at room temperature
* 1/2 cup confectioners’ sugar, plus more for coating baked cookies
* 1 teaspoon vanilla extract
* 1 3/4 cups all-purpose flour, plus more for dusting hands
* 1 cup pecans, finely chopped


1. Preheat the oven to 275 degrees F. Line cookie sheets with parchment paper.

2. Using an electric mixer, cream the butter and sugar together at low speed until it is smooth. Beat in the vanilla. At low speed gradually add the flour. Mix in the pecans with a spatula.

3. With floured hands, take out about 1 tablespoon of dough, roll it into a short log with slightly tapered ends, then shape into a crescent. Continue to dust hands with flour as you make more cookies. Place onto prepared cookie sheets. Bake for 30-35 minutes, until very lightly browned. When cool enough to handle but still warm, roll in additional confectioners' sugar, until completely coated.  (I found that my first layer of sugar melted and formed almost a sugar frosting on the cookies, so I dredged them again when they were cooler to get a nice (albeit messy!) powdery finish on them.  Cool on wire racks.

 Mexican Wedding Cookies and Molasses Gingerbread Cookies 
plated, just waiting on the Espresso Crinkles

Enjoy these cookies any time of the year, but for now let me wish you a very Merry Christmas!

Monday, November 8, 2010

Outrageous Brownies

 
I didn't name these little gems, but it certainly does them justice.  They are in fact Barefoot Contessa brownies, so you know they have to be good.  And they are.  Let me tell you:

I mentioned it somewhere on the blog before, but I have a running challenge to make the most chocolate-y things possible for my dad whenever I go back to Boston, which I did, briefly, this past weekend.  Thursday it just poured and poured all day on Nantucket, so in lieu of work I flexed my domestic muscles, cleaning a good portion of the house, and making some things in the kitchen that needed to be made.  Like, you know, more banana bread, and two batches of pesto (basil/pinenut and parsely/walnut).  And then, in the evening, as I was packing my suitcase, I realized that I had TOTALLY forgotten to make a chocolate offering.  At this point I was in my pajamas, and was not going to go to the store, so I needed a recipe that used things I already had on hand.  Luckily I stumbled upon Ina's recipe pretty quickly, and realized they were PERFECT.  Why?  First, you melt the butter, so I could use sticks right out of the freezer (although cut into cubes with a chefs knife to speed up the melting).  Add to that a little unsweetened chocolate, lots of semisweet chocolate, just a smidge of flour (so immediately I knew they had to be good), baking powder, vanilla and salt.  And, as I mentioned a few weeks ago in the Whiskey Soaked Bundt Cake post, Ina is a fan of adding that extra ingredient to bring out the essence of an ingredient, and in this case, instant coffee (or espresso) powder is that special something that makes you say "wow!"  Ina's recipe is enormous, and is baked on what is called a "half sheet" pan.  These pans, which measure 12 x 18 inches, are common in commercial kitchens, but bigger than most home cooks' pans.  I realized that half of a "half sheet" is essentially a lasagna pan (9 x 13 inches), so I halved the recipe and baked it in a Pyrex lasagna pan, which worked perfectly.  Below you will find the half recipe, which is probably all the brownie you need, anyway!  If you are cooking an enormous batch of brownies though, here's the full recipe, so you don't even have to do the math all on your own ;)

And if you're wondering what my dad thought of these?  He left me a voicemail and simply said "save the recipe."


Ina's OUTRAGEOUS Brownies (Adapted from the Barefoot Contessa Cookbook)
Makes about 24 2x2-inch brownies

I'm not normally a walnuts in brownies fan, so I omitted them, but I actually think these would have been better with nuts to break up the outrageous chocolatey-ness of these squares.  As most of the chocolate flavor comes from the chocolate chips that you use, it is worth using a quality brand that you really like.  You can also use bar chocolate for the 8 ounces of chocolate that you melt with with the butter.

* ½ pound (2 sticks) unsalted butter
* 8 ounces (1 1/3 cups) + 6 ounces (1 cup) semisweet chocolate chips, divided
* 3 ounces unsweetened chocolate
* 3 extra-large eggs (I used 4 large eggs, which is probably a little more than needed, but I think it worked fine)
* 1 ½ Tablespoons instant coffee or espresso powder
* 1 Tablespoon pure vanilla extract
* 1 cup + 2 Tablespoons granulated sugar
* ½ cup + 2 Tablespoons all-purpose flour, divided
* 1½ teaspoons baking powder
* ½ teaspoon kosher salt
* 1 ½ cups diced walnut pieces (optional)

1. Preheat oven to 350 degrees F. Grease and flour a 9×13 baking pan (aka, a standard lasagna pan).  (If your pan is a dark colored metal pan, only preheat the oven to 325 degrees F.)

2.  Melt together the butter, the 8 ounces of chocolate chips, and unsweetened chocolate on top of a double boiler (a mixing bowl on top of, but not touching, a pan of barely simmering water). Cool slightly. Stir (don't beat) together the eggs, instant coffee, vanilla and sugar. Stir this mixture into the warm chocolate mixture and cool to room temperature
 
3. Sift together the ½ cup flour, baking powder and salt, and then gently stir into the cooled chocolate mixture. Toss the walnuts and chocolate chips with flour to coat. (If you are omitting walnuts, use only 1 tablespoon of flour to toss the chocolate chips.)  Fold chocolate chips and nuts into the brownie batter, then pour batter into the prepared pan.

4. Bake for about 30 minutes, or until tester just comes out clean. Halfway through the baking, rap the pan against the oven shelf to allow air to escape from between the pan and the brownie dough. Do not overbake! Cool thoroughly, refrigerate for several hours or overnight before cutting into squares.  I was nervous about these brownies not coming out of the pan, but I discovered that running a knife around the edges of the pan, then inserting a flexible metal spatula down and under the brownies made the whole pan pop out nicely.  Use a nice sharp chefs knife to cut these dense, fudgey brownies into nice, clean squares. 

ENJOY!!! (And be sure to have a big glass of milk on hand--these babies need it!)

Friday, October 22, 2010

Cake > Chili

**Photos coming soon**
 
So, remember how last month I said that I like cooking one thing, then eating it for several meals in a row?  I take that back.  At least for now.  Two and a half weeks ago I made a pot of vegetarian chili, and I have been eating it since then.  TWO AND A HALF WEEKS, PEOPLE!!!  Okay, well, I admit, I managed to eat out every night the entire week that I cooked it, so I didn't actually eat any for the first seven days.  But, I've been eating it since then, and enough is enough!  I thought it would be a bloggable recipe, but to be honest, I can't even tell you at this point if I even liked it or not.  So it's not making to blog cut.

What will make the cut are a few cakes that I kinda snuck in during those 2 weeks when I was supposed to be virtuously eating that pot of beans.  Yeah, a few of those nights I might have just had cake for dinner...probably another reason why that stupid chili lasted so long.

In honor of a couple of bourbon drinking friends who were leaving the island for the season, I made Orangette's Whiskey Soaked Chocolate Cake, which is a big winner in my book.  It's a dark chocolate cake, made doubly--no, triply--delicious because it has both espresso and booze (and lots and lots of it) to really amp up that chocolaty flavor.  I have been reading Ina Garten's cookbook Back To Basics this week, and in the introduction she talks about unlocking the flavors in ingredients to bring out their essence, about that extra "special element" that each recipe needs to elevate it from ordinary to extraordinary.  In one perfect example she writes: "Close your eyes the next time you teas a piece of chocolate cake; did it really taste like chocolate, or did the fudgey-looking icing just trick you into thinking it would taste like chocolate?  The best chocolate desserts have a depth of flavor that hits you in a few ways--both sweet and bitter, with a winey complexity."  Ahh, Ina.  So right.  Couldn't have put it better myself, even if I tried all day.  I have noticed that Ina often uses coffee and/or espresso and rum to make her chocolate desserts extra special, so I am sure that she would approve of this cake, with its espresso and whiskey (or bourbon).  The cake has a dense and fudgey texture that makes you just think "chocolate," but it also has enough booze to make your nostrils sting just a little, or at the very least, makes you open your eyes and say "wow."

The one question that I am still trying to figure out is what the best brand of booze to use?  Molly of Orangette says to use a brand that you would also drink, but not being a whiskey or bourbon drinker myself, that's sort of hard for me to pinpoint.  I can't remember what I used the first time I made the cake, the second time I used Old Grand Dad, because that's what my parents had around the house.  (Yes, this is an oft-repeated recipe.  That's how much I like it)  This time I used Jim Beam, because it's the only brand my local liquor store sells in smallish bottles, and I only had about $10 on me when I went to go buy it, thus, it was all I could afford.  And besides, I didn't want leftovers, because I wouldn't drink it if I had it.  Perhaps next time I make the cake I will split the batter in half and try two slightly higher end brands, and see what's best.  I mean, it's a rough job, but someone has to do it, right? 

Finally, it is important to note that this cake is even better after it's had at least 24 hours to sit around and let the flavors mellow and meld, so it's a perfect bake-ahead cake for a party.

Whiskey-Soaked Dark Chocolate Cake (From Orangette.com)
Makes 1 Bundt cake or 2 loaf sized cakes

* 1 cup (2 sticks) unsalted butter, at room temperature, plus more for pan
* 2 cups of all-purpose flour, plus more for pan
* 5 ounces of unsweetened chocolate
* 2 Tablespoons of unsweetened cocoa powder
* 1 cup of your favorite whiskey or bourbon, plus more for soaking
* 1/2 teaspoon kosher salt
* 1/4 cup instant espresso granules
* 1 cup of boiling water
* 2 cups granulated sugar
* 3 large eggs at room temperature
* 1 Tablespoon vanilla extract
* 1 teaspoon baking soda
* Confectioners sugar for dusting, optional

1. Preheat oven to 325 degrees F.  Butter and flour a 10-cup Bundt pan or two 8-or 9-inch loaf pans, and set aside.

2.  Set up a double boiler--place a heatproof bowl over, but not touching, a saucepan of simmering, not boiling, water.  Break up the chocolate and put it in the bowl.  Stir occasionally until it melts, then remove from heat and let cool.


3. Put espresso and cocoa powders in a 2 cup capacity glass measuring cup and add enough boiling water so it reaches the 1 cup line, stir to dissolve.  Add 1 cup of whiskey or bourbon and salt, and set aside to cool.


4. In a large mixing bowl, cream the butter with a hand mixer until light and fluffy.  Add sugar, continue beating until well combined.  Add the eggs one at a time, beating well after each addition.  Beat in the vanilla extract, baking soda and melted chocolate.  Scrape down the sides of the bowl with a rubber spatula to make sure everything is well combined.


5. With the mixer on low speed, beat in a third of the whiskey mixture (2/3 of a cup). When liquid is absorbed, beat in 1 cup flour. Add another 2/3 cup of the whiskey mixture, beating until absorbed, then add the 2nd cup of flour, beat, then end with the remaining whiskey mixture.  The batter with be very liquidy; don't worry--this is normal.  Scrape the batter into the prepared pan, and smooth the top. Bake until a toothpick inserted into the center of the cake comes out clean, about 1 hour and 10 minutes for a Bundt pan, or about 55 minutes for loaf pans.


6. Cool the cake, still in its pan, on a wire rack for 15 minutes, then turn out of its pan and sprinkle the warm cake with additional whiskey. (I did this by pouring a little bit into a teaspoon, and then shaking the teaspoon over the cake, using a few tablespoons in all.  If you wanted to be high-tech about it, a clean spray bottle would probably give nice, even results.  Next time...)  Cool completely before serving.  For bonus presentation points, sprinkle with confectioners' sugar before serving.  Also fresh whipped cream, sweetened with a tiny bit of confectioners' sugar and a few drops of vanilla extract is a perfect accompaniment.  '


Enjoy!

Saturday, May 8, 2010

Leaving You With A Little Something

 
My sister Allison and I are off to Europe tonight (in theory, if the volcano would please dear god just stop spewing crap into the sky so our plane can leave).  We're visiting Ireland, Scotland and Amsterdam in honor of her graduation (with honors, yay Ali!), and very belatedly in honor of graduation (or so I like to tell myself, since I started working immediately upon graduating...times were different back in 2006, when there were jobs...) I don't know much about the food cultures of those places, other than boiled meat, sausage, and cabbage, so I don't know if I will be returning with any great ideas, so I wanted to leave you with one cookie recipe that will absolutely knock your socks off, so you have something to bake in my absence. 

My dad has always had a soft spot for this incredible triple or quadruple-y chocolate cookies from a Boston bakery chain called Rebecca's.  These cookies are so intense that he eats one over the course of several days, and if you ask for a bite he'll give you a piece about the size of your thumb nail, which is kind of stingy (sorry, Dad), but in fact is all you really need, because they are just that powerful.  It has been a personal mission of mine to bake something for him that matches Rebecca's cookies in intensity, and I think I have finally found that recipe.  I was waiting for my dad's approval before writing about them, because I didn't want to share something that was just so-so.  Fortunately, these cookies are not so-so, not even close!  (A few of my prior attempts, which I found delicious, did not make the cut, by his standards.)  These cookies come from Baker's Illustrated by way of Brown Eyed Baker, which is also the blog that turned me on to the Thick and Chewy Chocolate Chip Cookies a few weeks ago.  They are triple chocolate, and totally amazing.  Along with the Thick and Chewys, I may never try any cookie recipes ever again.  I just don't need to, these are just THAT GOOD.

So without further ado (and apologies for being a lazy photographer, yet again), the recipe, in its original quantities.  When I made these I halved the recipe, because one man, even a chocoholic like my father, does not need 42 cookies at once.  Fortunately it halves very nicely.  It also gives the dry ingredient measurements in ounces, which is great if you have a scale. 


Thick and Chewy Triple-Chocolate Cookies (From Baker's Illustrated and Brown Eyed Baker)
Makes about 42 cookies 

* 2 cups (10 ounces) all-purpose flour
* ½ cup (1½ ounces) Dutch-processed cocoa powder
* 2 teaspoons baking powder
* ½ teaspoon salt
* 16 ounces semisweet chocolate, chopped
* 4 large eggs
* 2 teaspoons vanilla extract
* 2 teaspoons instant coffee or espresso powder
* 10 tablespoons (1¼ sticks) unsalted butter, softened but still cool
* 1½ cups packed (10½ ounces) light brown sugar
* ½ cup (3½ ounces) granulated sugar
* 12 ounces (about 2 cups) semisweet chocolate chips


 1. Place the chocolate in a medium heatproof bowl over a pan of barely simmering water.  Melt the chocolate, stirring a few times, until smooth, then remove from the heat. (Alternatively, you could melt the chocolate in the microwave, just be careful to check it often, so it doesn't overheat and scorch.)

2.  While the chocolate is melting, beat the eggs and vanilla together in a small bowl, then sprinkle the coffee powder over to dissolve, and set aside.  In a separate medium bowl, sift together the flour, cocoa, baking powder, and salt; set aside.

3. Either by hand or with an electric mixer, beat the butter at medium speed until smooth and creamy, about 5 seconds. Beat in the sugars until combined, about 45 seconds; the mixture will still be quite granular. Reduce the speed to low and gradually beat in the egg mixture until incorporated, about 45 seconds. Add the chocolate in a steady stream and beat until combined, about 40 seconds. Scrape the bottom and sides of the bowl with a rubber spatula. With the mixer at low speed, add the dry ingredients and mix until just combined. Do not overbeat. Fold in the chocolate chips. Cover with plastic wrap and let stand at room temperature until the consistency is scoopable and fudge-like, about 30 minutes.

4. Meanwhile, adjust the oven racks to the upper- and lower-middle positions and heat the oven to 350 degrees F. Line 2 baking sheet(s) with parchment paper or silicone mats. Scoop the dough onto the prepared baking sheets with a medium ice cream or cookie scoop, spacing the mounds of dough about 1½ inches apart.  (If you don't have a scoop, make balls of dough that about the size of ping pong balls)

5. Bake until the edges of the cookies have just begun to set but the centers are still very soft, about 10 minutes, rotating the baking sheets front to back and top to bottom halfway through the baking time.  Don't over bake these--You want them to stay soft and chewy!  Cool the cookies on the sheets about 10 minutes, then transfer to wire racks to finish cooling to room temperature.  Cool the baking sheets before scooping more dough onto them (I pop mine in the freezer for a few minutes to expedite this); the parchment paper can be reused. 


ENJOY!!!  And don't miss me too much while I'm away :)


Sunday, April 18, 2010

Volkswagens, Daffodils, and Some Damn Good Cookies


I love that time in the spring when everything starts to green up, when the hedges and the shrubs and wild growth along the sides of the road begin to bud, so that from afar they look as though they have simply been dusted with the faintest hint of green.  Then, seemingly overnight, plants are covered with actual leaves, and it really feels as though spring has arrived.  The transition from brown to green means two (somewhat related) things.  I am ridiculously busy at work, and Daffodil weekend is approaching.  For my non-Nantucket readers, Daffodil weekend, which occurs in late April, is a festival of sorts for which locals and visitors alike turn out in droves to celebrate the simple daffodil.  (It's also the first time that many seasonal folks come to the back to the island,  hence the busy-ness at work.)  The highlight of the of the weekend is the Antique car parade, which starts in town and then crosses half the island to 'Sconset, where the cars park, their drivers set up tailgates, and then everyone proceeds to blatantly ignores open container laws and gets boozed up while dressed in all manner of ridiculously bright/preppy daffodil-adorned attire.  While I've gone out and spectated for the past two years, this will be my first year participating in the decorating of an antique car and being part of that spectacle.  The Nantucket Historical Association was the lucky recipient of a 1960s VW van, which is undergoing a major decorating effort and will be part of the parade this year.  I'm not going to spill the beans just yet, but it's going to be awesome.  But in order for it to be awesome, we needed to do some work.  And naturally, workers need to be fed, right?  So yesterday we gathered and sawed and drilled and taped and painted, and worked up an appetite, so we ate.

A stock-market-themed tailgate.  They only get more elaborate from here...


I use any gathering of people where food is being served (in this case, lunch), to try out new recipes and make yummy baked goods that I won't make just to have around the house (because that is just asking for trouble!).  Naturally my contribution to this gathering would be sweet in nature, because that's just how I roll.  My limiting factors were: a) ingredients, since I didn't do any shopping beforehand, and b) timing, since I only left myself about an hour to make something, and c) easy to serve and eat.  With that criteria, I figured my best bet would be cookies, since they bake quickly and are finger friendly.  The one catch with cookies, however, is that they often use room temperature butter, which I didn't have on hand (and didn't have time to wait for!)  For inspiration I turned to Brown Eyed Baker, which has a wealth of basic yet fantastic baked-good recipes.  I quickly stumbled across one incredibly indulgent "Thick and Chewy" chocolate chip cookie recipe that called for melted butter instead of room temperature--timing problem solved!  I got to work immediately, and about an hour later I was packing the cookies, still warm from the oven.

As you readers have probably guessed, I always like to try new recipes.  Sometimes they're good, sometimes they're just so-so (obviously I don't write about those), and sometimes they're so great they're an automatic keeper, and let me tell you, this one is a keeper!  There are about a million chocolate chip cookie recipes out there, but as far as I'm concerned, I've found my winner.  And I'm not the only one.  My first assurance that these cookies were in fact as great as I thought they'd be was when my friend Beth nabbed one before lunch and declared "these cookies are amazing!" (or something like that).  When we all broke for lunch the praise kept rolling in, and it was impossible for people to eat just one (despite their hefty size!).  Here's what makes them so amazing:  the fact that they stay chewy, even after cooling (thanks to the butter plus and extra egg yolk).  Enough vanilla so you could actually taste it.  A perfect sweet-salty balance.  The aforementioned hefty size (and I even down-sized mine a tiny bit!).  The thick-and-chewiness...oh wait, I already said that.  The key to the chewiness is pulling them from the oven when the centers are still soft and puffy looking so you don't run the risk of over-baking them.  Apparently cooling the cookies on the sheets also enhances the texture--as I was a bit crunched for time I didn't have an opportunity to let them cool all the way before packing them, and as far as I can tell, they didn't suffer too much because of it.  We consumed most of these cookies about 2 1/2 hours after they were pulled from the oven, so not only were they soft, but the chocolate chips were still partially melted, which no doubt contributed to the overwhelmingly positive response. Still, 24 hours later they're still awesome (don't worry, I just ate another, just to be sure), so don't delay, makes these cookies today, and you too will be singing their praises. 


Thick and Chewy Chocolate Chip Cookies (Adapted from Brown Eyed Baker and Baking Illustrated)
Makes 18-22 large cookies

This recipe's original source, Baking Illustrated, gives ingredient measures in weights as well as cups.  Armed with a trusty kitchen scale, I measured the dry ingredients by weight.  To satisfy my own curiosity I compared the weigh and volume measurements, and found that when measuring by volume I always ended up with more flour and sugar.  So, if you have a scale, use it, and if you don't, be sure not to overfill your cup measures.  When you're going for soft and chewy you don't want to dry out your cookies with too much flour, or over-sweeten with too much sugar!

* 2 cups plus 2 tablespoons (10.625 ounces) unbleached all-purpose flour
* 1/2 teaspoon baking soda
* 1/2 teaspoon salt
* 12 tablespoons (1 1/2 sticks) unsalted butter, melted and cooled until warm
* 1 cup packed (7 ounces) light or dark brown sugar
* 1/2 cup (3 1/2 ounces) granulated sugar
* 1 large egg plus 1 additional egg yolk
* 2 teaspoons vanilla extract
* About 1 cup semisweet chocolate chips
 
1. Adjust the oven racks to the upper- and lower-middle positions and preheat the oven to 325 degrees F. Line 2 large baking sheets with parchment paper, a silicone baking mat, or spray them with nonstick cooking spray.

2. Whisk the flour, baking soda, and salt together in a medium bowl and set aside.

3. Using an electric mixer or just a wooden spoon or spatula, combine the melted butter and sugars until thoroughly blended. Beat in the egg, yolk, and vanilla until just combined. Add the dry ingredients and beat at low speed just until combined. Stir in the chocolate chips by hand.

4. Roll the dough into ping-pong sized balls--a scant 1/4 cup or so of dough.  Place the formed dough balls on the prepared baking sheets, spacing them 2 1/2 inches apart.

5. Bake until the cookies are light golden grown and the outer edges start to harden yet the centers are still soft and puffy, 14 to 17 minutes, rotating the baking sheets front to back and top to bottom halfway through the baking time. Cool the cookies on the sheets before removing with a metal spatula.  Enjoy--I know you will!!!