Showing posts with label Eggs. Show all posts

Thursday, March 6, 2014

Greens, Eggs (and Ham?)


I love a dish that gives me room to experiment, and this this versatile greens and eggs dish certainly fits the bill.  A combination of hearty greens, tomatoes, sausage, eggs, and cheese all baked together makes a great weekend breakfast or a quick weeknight dinner.  

I made this for dinner the other night using a blend of pre-cut "Southern Greens" from Trader Joe's--Mustard, Turnip, Collard, and Spinach.  A blend is a great way to incorporate several types of greens at once, without having to buy bunches of all of them.  (And it's a great shortcut!)  For cheese I used some Gouda that was kicking around in the back of the fridge, and a chicken andouille sausage to add some kick!  I was very happy with the results, but I look forward to playing around and using different greens, trying both hard and soft cheeses, and different sausage flavors.  (And obviously, the sausage can be omitted to make this a vegetarian meal.)  It's easy to double or triple for a crowd; I can see myself making this for a brunch buffet and just dumping the whole thing in a casserole dish.

Tuesday, February 1, 2011

Best. Day. Ever. (Part 1)

 
Today was, as you might have guessed, the best day ever.  Sorry, I've been kind of slacking on the keeping you updated on what I'm doing in culinary school thing.  Truthfully, I'm usually exhausted at the end of the day, and then I have to do homework, and posting just takes me so long that I haven't been keeping up.  But today was so fantastic that I can't keep it to myself. 

So what did we do today?, you're probably wondering.

Answer: Eggs, Cheese, & Dairy.  Happy days.  I will just have to look back on this and remember today when we get to butchering, which will not be the best day.

So we started out by making sweet souffles (as opposed to savory).  Students chose between a Grand Marnier souffle or chocolate; I chose chocolate (obvi).  

 Before the oven

As a seasoned savory souffle maker, I found the process quite straight forward, but I will have to experiment and adapt the recipe a bit before I post it because its written in "cooking school" quantities--i.e., more than you would ever make at home.  However, both the chocolate souffle and Grand Marnier Souffle were great, particularly the Grand Marnier, as it turned out (I think the chocolate souffle needs more chocolate...or at least that's one chocoholic's opinion!)

 My baby coming out of the oven


Digging in

Next: Eggs.  First we watched Chef John demonstrate about eight different ways to prepare eggs, all beautiful and delicious. 

Chef John shows us how it's done

The most interesting to me were shirred eggs, which were eggs cracked into a ramekin filled with pieces of thinly sliced meat (I think it was ham?), dobbed with (lots of) butter, then baked until the eggs were adequately set.  There was so much going on while he was demonstrating that I don't know exactly how long or what temperature, but if I had to guess I'd say about 8 minutes at 375 or 400?  I will have to get back to you on the details of this.  

Shirred Eggs

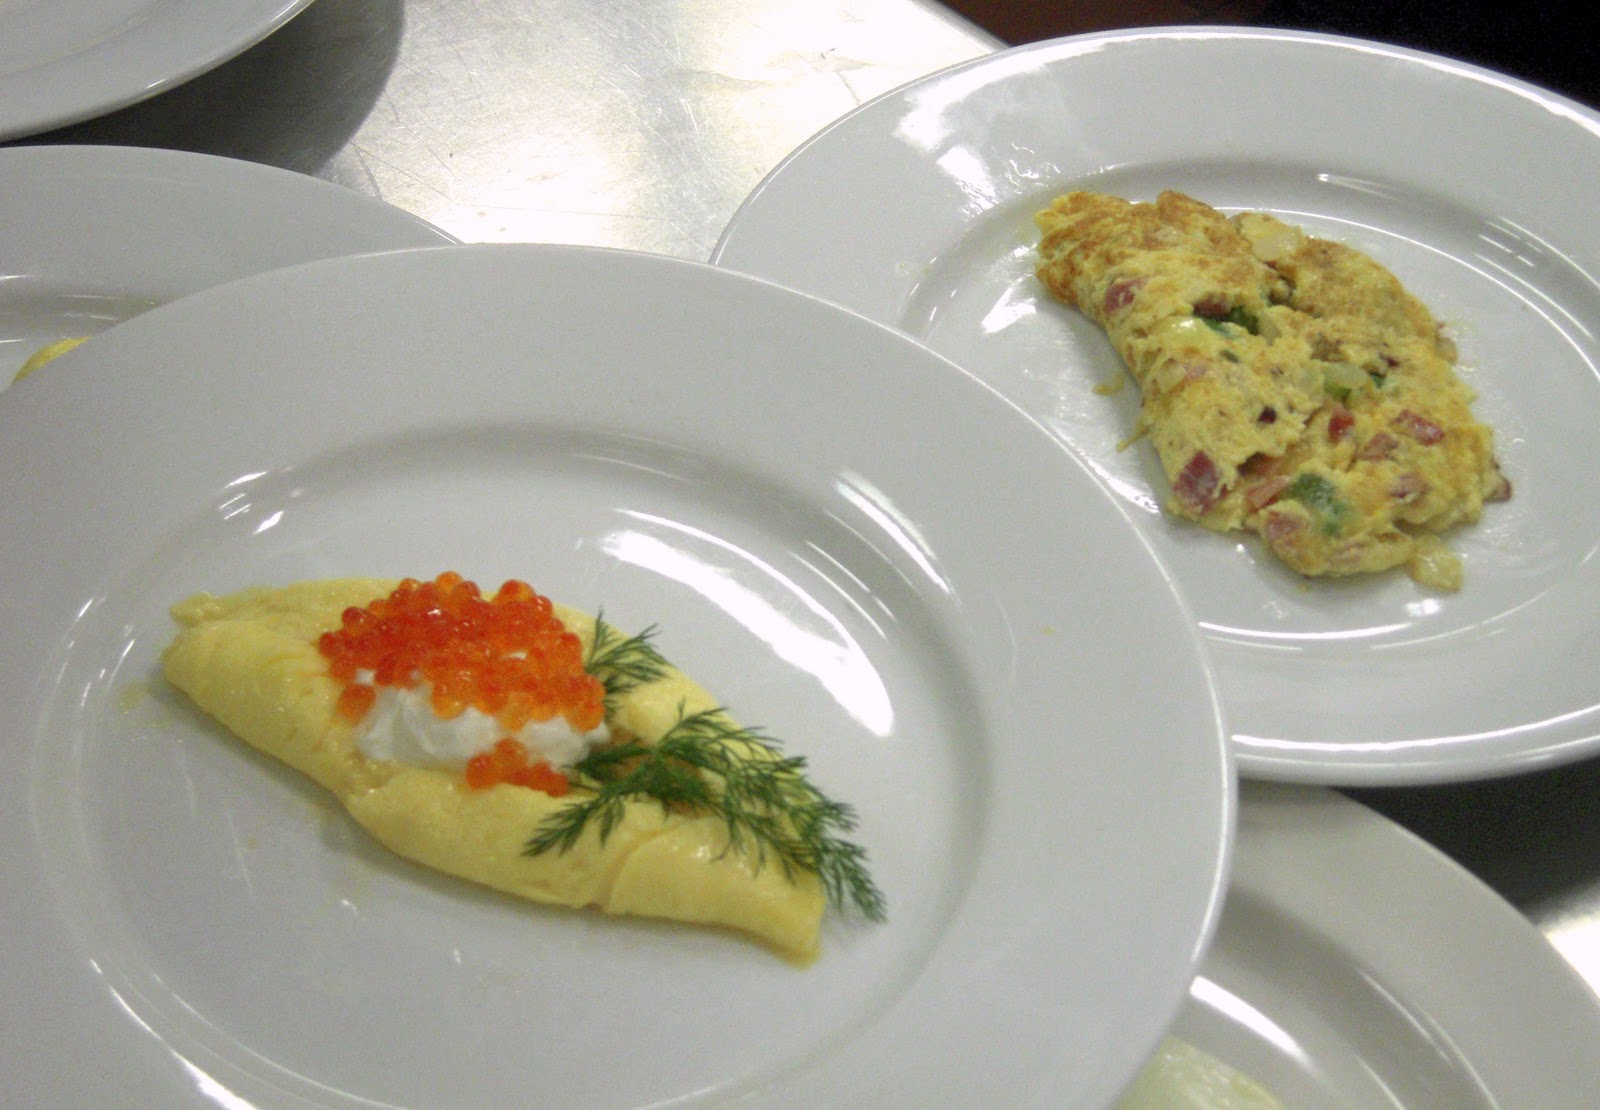
He also did an individual leek, goat cheese and pesto frittata, which was awesome, and demonstrated both French and American style omelets, which are actually quite different.

 French omelet with sour cream and caviar (left); American "Denver" omelet (right)

The most interesting thing besides the shirred eggs was a French style dessert omelet, which was just your basic French omelet (I can't do it justice here, you really just need to see someone doing it, but basically you start out in a pan over medium heat, add 2 beaten eggs, then move them around with a spatula almost like you're scrambling the egg, then , when it's mostly set, you leave it alone (except a little bit of jiggling to make sure it isn't sticking or browning), until it's totally set, then you fold one third over, and as you slide it out of the pan you fold the other third over, so the top is nice and smooth.  So once John made a perfect French omelet he filled it with apricot jam before folding it, and sprinkled it with confectioner's sugar, then he took a hot metal skewer (that he had stuck in the gas burner for a minute) and seared three diagonal lines through the sugar.  Beautiful and delicious!  It had never occurred to me to do a sweet omelet, but it was delish :)  

Sweet apricot filled omelet

 The egg dishes multiply faster than bunnies

After John whipped out all these beautiful egg dishes, we set to perfecting our own eggs.  After three takes I produced one decent French omelet, and I also practiced my scrambled eggs (although to be honest, I think I'm already pretty good at those--they are my fave), and then I practiced my over easies, including flipping them with just (several) flick(s) of my wrist.  Here's what I can tell you about flipping eggs using just your wrist: "Don't be afraid!" (in your best Julia Child voice).  And do it over the sink, just in case you miss (but "never apologize!").  My first one I did over too high heat, and it got too crispy and brown, but my second one was quite pretty.  The biggest take away lessons from all of this egg frying/scrambling/omeleting/frittata-ing?  

A sampling of my egg dishes: Over medium, scrambled, and 3 attempts 
at French omelets, getting progressively better from right to left

1. Use the right size pan.  (We were doing all of these individually, in 6 or 7-inch pans, like you would at an upscale restaurant). 

2. Make sure the pan is ridiculously non-stick and/or well seasoned

3. Only cook over moderate heat--browning isn't ideal, except for some American-style omelets

4. Clarified butter.  And lots of it.  (See pic of John, above.  That measuring cup of yellow stuff--butter.)  Clarified butter is regular butter without the milk solids.  To make it you can either melt a hunk of butter gently, then let the milk solids (the white part), sink to the bottom, then skim off from the top.  The part you want to use is the very clear and pure yellow part.  It is ideal for eggs because it doesn't brown or smoke, so it's forgiving if you overheat your pan, and all that jazz.  You can make your own by melting like, a pound of butter then letting the white parts sink and skimming off the yellow part (we go through it like water in cooking class, so we're making our own, often).  Alternatively, you can find in ethnic markets and better supermarkets as ghee, aka, Indian clarified butter.

Ooh, and I poached the most beautiful egg ever, and made it into an egg Benedict sandwich, which was fantastic.  If you are like the old me (before I learned how to poach eggs), you probably don't like poaching eggs, because they get all runny and weird in the water.  But, I found out how to do it well, and I have to say, my first egg was even prettier than Chef John's. So, here are the tricks:

Egg Benedict.  I was so excited I bit into it before I took the picture. 
Sorry.  That black thing on top is a truffle.  Seriously fancy here, people.

1. For every quart of poaching water, you add 1/4 cup of white vinegar.  This sounds like a lot, but it's not, and it's crucial, (you won't even taste it--promise).  DON'T put any salt in your water, it will make the whites run.

2. If you're not using the poached eggs right away, have a bowl of iced salted water set up.  When your eggs are doing cooking, transfer them into the cold water, which will stop the cooking and keep then moist.

3. Pre-crack your eggs into a teacup or other small vessel and use it to slip the egg into the water.  This way it will go in as one whole blob, and you'll avoid having too much "spread" of the whites.

4. Use extremely fresh Grade A eggs--these are the firmest--again, less spread.

5.  Use poaching water that is simmering, just on the verge of a boil.  Barely simmering water isn't quite hot enough, and boiling water will disrupt the eggs.

6. Timing--Most people like eggs poached between 2 1/2 and 3 minutes.  If you are poaching multiple eggs in the same pot, add 10 seconds per egg for each one in the pot (ex., if you're poaching 4 "2 1/2" minute eggs, total cooking time should be about 3 minutes, because you add 10 seconds for each additional egg).  Being the yolk-hating weirdo that I am, I prefer my egg poached closer to 5 minutes, but if you follow the first guidelines--vinegar in the water, proper simmering temp, and pre-cracking your eggs--no matter how long you cook them, they should come out well. 

If your whites do end up spreading a lot, it's totally acceptable to trim up the whites to make them look prettier--or not, whatevs.  I won't judge if you like to quantity over looks.  

So, yeah, that's a lot about eggs.  I probably ate at least half a dozen today.  Good thing I don't have a cholesterol problem (yet).  Hopefully a few of these tricks will help you next time you need to cook an egg, and when I get some more specifics on the souffles, you will be the first to know, I promise!

Stay tuned for part 2 of BEST DAY EVER: Wine and Cheese pairing.  Heaven!


Wednesday, October 27, 2010

Theo the Greek's Spinach Pie


I am pleased to say that there was a specific request that this recipe make it into the blog, which validates it, at least in my mind.  Sometimes when I cook, especially when it's just for me, I have trouble gauging how good or how interesting things are.  Last Saturday night though I hosted 16 Williams Womens' Crew alums at my parents' apartment, so I had a whole host of people to cook for.  I prepared a mix of new and tried-and-true recipes.  This particular recipe was new to me, and comes from Table Talk, a cookbook written by Martha's Vineyard cafe owner Carol McManus.  I heard about it when she was interviewed on a local NPR talk show, where she made particular mention of the much-requested veggie burger recipe.  So I took the book out for the veggie burger recipe alone, (which, at least a year later, I have yet to make).  I also copied down a handful of other yummy sounding recipes, including this one for Spinach Pie, which I had completely forgotten about until I was poking around my computer the other day, looking for something completely unrelated.  It turned out to be so popular that several friends requested that the recipe appear on the blog, so they could make it, to.

Theo the Greek's Spinach Pie is essentially a quiche but with more veg and less egg, so you can pretend that it's healthier.  It's super easy, comes together in minutes and then, if you happen to be making this for a party and desperately need to shower, you have a whole 40 minutes while it bakes to pull yourself together!  The only thing you have to remember is to give yourself enough time to let your frozen spinach thaw, since man, that stuff is like a brick!  I left my spinach in the fridge for 26 hours beforehand, assuming it would thaw in there, but it didn't.  So I put it in a colander on a cookie sheet while my oven was preheating to help it along.  A little unconventional, I know, but the microwave was otherwise engaged.  And once it's thawed, you need to squeeze the heck out of that spinach.  It holds a lot of water!  I justsqueezed it in my hands, but if I had had some cheesecloth, I think the best way is to put it in a piece of cheesecloth, twist the corners together to make a pouch, then just squeeze, squeeze, squeeze.  You do dry out the spinach a little more though when you saute it for a few minutes with the garlic and tomatoes.  I tweaked a few of the ingredient quantities so that they correspond to standard packages, instead of (what seemed to me to be) arbitrary quantities.  But it's essentially all the same, plus or minus a few ounces of spinach and tomatoes.

Update 1/24/12: I revisted this recipe and played with it a little more.  Further tweaks and ideas can be found here.


Theo The Greek's Spinach Pie (Adapted from Table Talk by Carol McManus)
Serves 8 or so

* 1 Tablespoon chopped garlic
* 3 Tablespoons olive oil
* 10 oz. package of frozen spinach, thawed and with liquid squeezed out
* 28 oz. can of whole tomatoes, drained and chopped into large pieces (or the equivalent in fresh tomatoes, about 2 cups)
* 1/4 teaspoon ground black pepper
* 1/2 teaspoon ground nutmeg
* 4 large or jumbo eggs, lightly whisked together
* 9 oz. feta cheese, crumbled into small pieces
* Basic pie crust for single pie (you can definitely use frozen here!)

1. Preheat oven to 350 degrees F.

2. In a frying pan, sauté garlic in olive oil over low heat for 2 minutes--keep an eye on it though.  It should get golden, but not burnt, or else it will just taste bitter.  Add defrosted spinach drained of liquid.  Sauté for 3 more minutes.  Add chopped tomatoes, pepper, and nutmeg, and sauté 2 more minutes.  Set vegetables aside to cool.

3. In a large bowl, whisk eggs.  Add cooled vegetables.  Fold in feta cheese, and pour into prepared pie crust.

4. Bake pie 35-40 minutes until firm in center.  Allow to cool for a few minutes before slicing and serving.


Enjoy!!

Sunday, April 18, 2010

Shakshuka: Eggs Poached in Spicy Tomato Sauce


I wish I had something inspirational to say about this next recipe, but truthfully, I don't.  I don't even have a photo to show you, sorry.  But I do have an easy, tasty recipe, so read on.  

I hadn't even heard of Shakshuka, an Israeli dish of eggs poached in a spicy tomato sauce, until it was featured on Smitten Kitchen, an excellent cooking blog that I often read.  Although in Israel Shakshuka is traditionally served as a breakfast dish, for my American palate I thought it was much more well suited to dinner (I usually steer clear of anything more potent than Cheerios at breakfast).  I was enticed by the simple ingredient list and easy prep--the perfect meal for the end of a busy week.  

I tweaked the recipe just a bit, most notably in the number of servings.  Smitten Kitchen and Saveur, which originally published this recipe, claim that it serves 4-6, but Erik and polished off 2/3 of it on our own (hey, don't judge, it's mostly vegetables!).  However, I reduced the number of eggs accordingly, from the recommended 6 to 3, basically budgeting 1 egg per serving.  The diameter of the pan I used was smaller than the recommended 12 inches, so in my pan 3 eggs fit perfectly--any more would have just created a thick, egg-y layer instead of individually poached eggs.  I suppose that if you had a larger pan and used 2 eggs per person you could stretch the sauce a bit, but I liked mine saucy without too many eggs--healthier that way, right?  I also bumped up the amounts of cumin and garlic, because I simply can't get enough of those delicious flavors.  I wimped out on the jalapenos, however, and used only 2.  Without their seeds, jalapenos actually don't pack too much of a punch, so when I make this again I will use the recommended 3 jalapenos, or add a few seeds, since those are where most of the heat resides.  This is a forgiving and flexible recipe that's easy to prepare, so try it when you're in the mood for something easy, comforting, and full of flavor.


Shakshuka (Adapted from Smitten Kitchen)
Serves 3 to 4 

* 1/4 cup olive oil
* 5 Anaheim chiles or 3 jalapeños, stemmed, seeded, and finely chopped
* 1 medium yellow onion, chopped
* 6 cloves garlic, crushed then sliced
* 1/2 Tablespoon ground cumin
* 1 Tablespoon paprika
* A 28-ounce can whole peeled tomatoes, undrained
* 1/2 cup water
* Kosher salt, to taste
* 3-4 eggs, or more, if you feel so inclined
* 1/2 cup crumbed feta cheese
* 1 generous Tablespoon chopped flat-leaf parsley
* Warm pitas, for serving

1. Heat oil in a 12-inch skillet over medium-high heat. Add chilis and onions and cook, stirring occasionally, until soft and golden brown, about 6 minutes. Add garlic, cumin, and paprika, and cook, stirring frequently, until garlic is soft, about 2 more minutes.
 
2. Crush the tomatoes.  You can do this by transferring them to the bowl and crushing them with your hands, or just crushing them as you add them to the skillet.  Either way, crush the tomatoes and add them, along with their liquid and 1/2 cup water to the skillet.  Reduce the heat to medium-low, and simmer, stirring occasionally, until thickened slightly, about 20 minutes. Season with salt, to taste.

3. Crack eggs over sauce so that eggs are evenly distributed across sauce’s surface. Cover and cook until yolks are barely set, about 5 minutes.  (Obviously you can simmer for less time if you prefer a runny yolk, like Erik does).  Using a spoon, baste the whites of the eggs with tomato mixture, being careful not to disturb the yolk.  Sprinkle shakshuka with feta and parsley and serve with warm pitas, cut into quarters, for dipping.  Enjoy!


Monday, April 5, 2010

A Monstrously Good Salad

 
I may have created a monster.  This is what happened: 

My family came to visit this weekend, and brought with them several bags of Trader Joe's goodies.  Happiness!  Among those things was a bag of haricots verts, yummy skinny green beans (pre-trimmed!), and a box of cherry tomatoes.  On Saturday, after a long walk around town and on the beach, and a quick visit to the Whaling Museum, we were hungry for lunch, but it was already 2 o'clock, and I didn't want to eat anything that would spoil my appetite for what I knew would be a delicious dinner at Centre Street Bistro, where we had 7 o'clock reservations. (Dinner was fantastic, by the way.)  My dad suggested we use the green beans, so working with what we had in the house, I boiled the green beans, sliced some of the cherry tomatoes, and tossed them with a simple mustard-y dressing with just a hint of balsamic vinegar and olive oil.  Meanwhile my mother soft(ish) boiled two eggs, which she peeled and sliced, and tossed on top of the green beans and tomatoes.  Instant success!  My dad loved the salad so much that he insisted we make it again for Easter breakfast/brunch, so we did, and had it alongside scrambled eggs and bacon, and chocolate cake (another post for another time).  Unconventional, but delicious.  Erik had the green bean salad for the first time on Easter, and liked it so much that today he called me at work, and asked if it would be okay if he made it again for dinner!  I said yes, and so tonight we had it again alongside delicious spicy turkey burgers with grilled red onion, avocado slices, and pepperjack cheese.  Slightly unconventional yet again, but you see, this simple combo is so yummy that we'll eat it with just about anything!  Erik hadn't seen me make the salad the first two time, so his take was slightly different : he used apple cider vinegar instead of balsamic and tossed in a minced shallot.  These little changes were delicious, and I couldn't say which version I like better.  But either way, this quick salad is a winner, on its own or alongside any unconventional thing you can think of.

UPDATE:  I have received several questions about the egg issue: what constitutes soft boiled, and if it's soft, does the yolk mix into the dressing?  For the past three days when we've made this salad, the egg topping has been slightly different.  When my mom made the eggs, the yolks were not completely set, but were not runny, either.  The yolks mixed in a bit, but I wouldn't say they coated the beans.  On Easter I lost track of time and ended up hard boiling the egg, so when the egg was sliced and tossed into the salad the yolk chunks sort of distributed themselves.  Erik's egg was somewhere between those two.  If I make this salad once or twice more I will probably cover all points along the egg-boiling spectrum!  Personally, I hate runny yolks, so I always want them to set up at least a bit.  However, if you like runny yolks, by all means, just cook your egg until your whites are set and the yolks are still liquid-y enough to coat the beans along with the dressing.  I'm pretty sure there is no wrong way to do this, and I'd love to hear from anyone who tries the runny yolk method to hear how it is!

Although I didn't take pictures, my mom captured this image on her iPhone.  
The huge hand belongs to my dad.

Impromptu Green Bean Salad
Serves as many as you like, just scale accordingly

* Haricot Verts or regular green beans, ends trimmed
* Grape or Cherry tomatoes, halved
* Minced shallot (optional)
* Good Dijon mustard
* Balsamic or Apple Cider vinegar
* EVOO
* 1 or 2 soft or hard boiled eggs

1. Prepare your eggs:  I like the Julia Child method, which is to cover the eggs with water, bring to a boil, then remove from the heat, cover the pan, and let sit 17 minutes (for a hard boiled egg), then transfer to an ice bath until the eggs are cool enough to peel and slice.  I haven't experimented with the perfect length of time for a soft-er boiled egg, and I'm simply too lazy right now to go downstairs and find out if the cookbook says what it is, so let's guess that it's maybe 10 minutes? 12 minutes?  Who knows?  I ended up overcooking the egg the second time around, and the salad was still delish.

2. Bring a larger pot of water to a boil, add salt, and then boil the green beans until they are about 90% cooked.  Drain and refill the pan with very cold water and a handful of ice cubes to stop the cooking process.  (It's always best to pull the beans off the stove just before they're finished, because they always cook just a tiny bit more before you get them in the ice bath.)

3.  In the bottom of your serving dish of choice, mix together equal parts mustard and vinegar.  When they are combined, slowly add about the same amount of EVOO.  The dressing here should be a bit thicker than regular salad dressing.  Taste, adjust components if necessary, and season liberally with freshly ground black pepper, and salt, if desired.

4.  Wash and halve cherry tomatoes and add to the serving bowl. 

5. When green beans have cooled, pat them dry(ish), cut them in half, and toss in with the tomatoes.  Add minced shallot, if using, and toss all together.

6.  Slice eggs and add to the salad, and toss once more just to incorporate the eggs.  Serve and enjoy!


Luckily for me, tonight's salad used the last of the green beans, and Erik promises that we won't make it tomorrow (but then added a moment later that haricot verts are on sale at the Stop n Shop right now :)  While three days in a row might be my limit, I know this is one simple salad I will return to again and again (and again and again...)


Sunday, March 14, 2010

Cleaning Out The Fridge Quiche

 
See a theme here?  Cleaning out the fridge?  I've been on a kick lately.  Sometimes I get so overwhelmed by the odds and ends in my fridge that I'm just desperate to get rid of it all.  This week I haven't shopped once, it's been all about using up the stuff I already have.  

The dish du soir is quiche, one of my all time faves.  Eggy cheesy goodness in a pastry shell--sort of like souffle but richer, and practically worry-free.  This isn't the first time I've used quiche to clean out the fridge--some of my favorite combos have been born out of this very routine, such as my "southwestern" quiche: onion and bell pepper remnants diced and sauteed quickly and tossed with some of Emeril's Southwestern Essence or just a pinch of cayenne pepper and pepper jack cheese.  Or the dregs of a box of frozen spinach, thawed, squeezed dry, and paired with just about any cheese and a couple of dashes of nutmeg.  The list really could go on. 


Tonight's "Cleaning Out The Fridge" quiche was extra-special because I actually had pie dough that I needed to "get rid of."  If you recall, I had been planning on making mini-quiches last weekend for the Oscars, and after making the dough decided to scrap the project due to egg/cheese overload.  Usually I use frozen pie crusts for quiche (insert gasp here), but since I was going to make the mini quiches in muffin tins, I needed my own pastry dough.  The particular dough that I made, Martha Stewart's classic pate brisee, is supposed to keep well frozen for a month, but I knew if I didn't use it up soon many months would pass before I remembered I had it.  So I started thawing it in the fridge this morning, and by 6:30 it was ready to roll.  In addition to the pate brisee, I still had quite a bit of that ham left (remember, it showed up in potato gratin a few nights ago).  I also had some cheddar leftover from mac and cheese that we made about a month ago.  And, to pretend this dish had some nutritional benefit, I threw in one small onion, because I always keep onions on hand.

Before rolling the dough I assembled the custard part of the filling, which is more or less equal parts egg and sour cream (I use reduced fat), and about 1 cup of cheese, plus whatever meat/veg.  Can't you see how precise this recipe is?  Ha!  Clearly, I totally eyeball the whole thing.  So I mixed my egg, sour cream, and cheese, and on Erik's suggestion added some fresh dill and thyme that we had kicking around.  Then I diced the onion and sauteed it in a bit of EVOO until it had softened a bit, about 8 minutes probably.  Then I diced some ham in 1/4 inch dice or so.  When I was ready I sprinkled my silicone mat with flour, and rolled out the dough so it was about 18-1/4 inch thick.  After carefully transferring it to the pan and adjusting it so that I didn't have to stretch it to make it fit (apparently if you do this the pastry will shrink as it bakes), I rolled the overhanging edges and pinched around the edge to make a rim.  I kind of winged it, because actually, this is the first pie crust I've made from scratch.  But I'm happy to say, it was pretty easy!  Then I layered in the custard mix and the fillings....and realized I had waaaay too little.  I had made enough for a frozen pie crust, but my deep dish glass pan is nearly twice as big!  So then I mixed up some more custard mix, finished filling it, baked it for about 45-50 minutes, until it was set.  Erik put together a nice salad with mesculan, cuke, red bell pepper and chopped scallions dressed with a simple dijon-lemon juice-EVOO-S&P dressing (an easy classic), and dinner was served! 

I'm not going to lie, the quiche was delicious.  Although, I've never really met a quiche that wasn't.  While I will probably continue using frozen pie crust 90% of the time, the homemade crust was noticeably yummier, I thought (or perhaps I was just thinking about all that work making it...)  But whether you opt to duplicate tonight's recipe, or discover your own combination, think about quiche when you're thinking about cleaning out the fridge...or not.  It is so delicious that you should think about it next time you're having people over for brunch, or lunch, or dinner, or just whenever you want a delicious, easy dinner. 

Cleaning Out the Fridge Quiche

I had to nearly double the amounts of egg, sour cream, and cheese to make this fill my deep dish pie plate.  However, the amounts listed below are for your average sized frozen pie crust, which is what I use most of the time.

My half-filled quiche.  Oops.  If that were a frozen pie crust, it would have been perfect.

* 4 or 5 eggs
* About 1/2 a pint, aka 1 cup, of sour cream (reduced fat works fine)
* About 1 cup of grated cheese, plus and additional 1/4 cup or so to sprinkle on top. Semi-firm varieties, such as Cheddar, Swiss, Monterey Jack, and Gruyere work well
* Freshly ground pepper

At this point, that's all you need for a yummy plain quiche.  However, meat and veggie additions make it even yummier.  Tonight I used:

* 1 small onion, diced and sauteed in EVOO until softened
* About 1/2 cup diced ham (organic, nitrate-free, if you can find it)
* Fresh thyme, leaves stripped from the stems
* Fresh dill, chopped

1. Preheat your oven to 350 degrees F.  Remove your frozen pie crust from the freezer and allow to thaw while you prep filling.


2. Whisk together the egg, sour cream, pepper, herbs, and 1 cup of grated cheese in a bowl. 


3.  In a small skillet, saute onions in some EVOO over medium heat until they are softened, about 8 minutes.

4.  Dice ham to a 1/4 inch dice.


5.  Place pie crust on a cookie sheet (if you're using a frozen crust in a flimsy pan).  Pour about 1/3 of the custard filling into the pie crust (it doesn't matter if the crust hasn't thawed completely).  Sprinkle on about half the ham and onions, and then repeat with another 1/3 of the custard, the remaining ham and onions, and then the remainder of the custard.  This step doesn't have to be too precise, but I do it this way instead of mixing everything together to help ensure an even distribution of the chunky stuff.  Sprinkle the top of the quiche with the 1/4 cup of grated cheese. 

 Filled to perfection.  You don't want to go all the way to the top, because the egg will bake up a bit

6.  Bake quiche, on cookie sheet, for about 35-40 minutes, or until top is golden brown and the center of the quiche doesn't jiggle if you shake it gently.  If the crust is browning too quickly, cover it with a sheet of aluminum foil.

7.  Cool quiche for about 5 minutes before slicing, and serving like a pie.  Enjoy!


If you're feeling really inspired and want to make your own crust, try of Martha Stewart's classic pate brisee, recipe below.  The quantities listed make a single crust for 9 or 10-inch pan.

* 1 1/2 cups all-purpose flour
* 1/2 teaspoon salt
* 1/2 teaspoon sugar
* 1 stick unsalted butter, chilled and cut into small pieces
* 1/8 to 1/4 cup ice water 

1. In the bowl of a food processor, combine flour, salt, and sugar. Add butter, and process until the mixture resembles coarse meal, 8 to 10 seconds.

2. With machine running, add ice water in a slow, steady stream through feed tube. Pulse until dough holds together without being wet or sticky; be careful not to process more than 30 seconds. To test, squeeze a small amount together: If it is crumbly, add more ice water, 1 tablespoon at a time. 

3. Turn dough out onto a sheet of plastic wrap.  If needed, use your hands to gently press the dough together into a disc.  Wrap tightly in the plastic and refrigerate for at least 1 hour. Dough may be stored, frozen, up to 1 month.

4.  To roll the dough, lightly flour a rolling surface and your rolling pin.  Starting rolling from the center, and rotate the dough often to create an even circle (or circular like shape)  Roll to about 1/4 to 1/8 inch thick, and until it reaches the correct size.  Place your pie pan (ungreased--plenty of butter in there already!) right next to the dough, and gently lift it into the pan and center.

5. Trim any overhang that's too long, and transfer the dough to a part that doesn't have much of a lip, if necessary.  Fold the overhaning dough over towards the center of the dish, and pinch the edge all the way around to create a lip.

 Behold!  My first pie crust!  The unsightly overlap will be covered with egg, so don't sweat it.

Sunday, June 28, 2009

First Official Food-Related Post (a.k.a.: Herbed Potato Souffle)

 
I love love LOVE souffles. They are perfect on so many levels. Egg-y cheese-y goodness in a light, airy format. Plus, they are baked, thus I am capable of making them, but they count as a meal. And you will impress people when you whip a beautifully golden puffed souffle out of the oven. Heck, you'll even impress yourself!

I think many people are intimidated by souffles. I say this based on the fact that when I talk about them with my peers, most have never attempted to make one, and are impressed by the fact that I can do it. I don't claim to be a souffle genius, but any souffle proficiency that I do possess I attribute entirely to my mother. She went through a souffle phase at some point (infinitely better than the beet phase and also decidedly better than the roast chicken phase, which lasted long enough to even wear out my love for all things chicken). I must have been in the 8th grade or so when we started having souffle every Sunday night for a number of months, which (appropriately) was dubbed "Sunday Night Souffle." We had a very spartan kitchen whose lone non-essential appliance was a sometimes-functioning Cuisinart. Which is to say, no electric mixer. Which meant that with this incessant souffle mixing, my mother needed someone who was willing to beat egg whites with a sticky old manual egg beater for 15 minutes or so, which is where I came in. (Now that I think about it, I also got stuck grating the cheese, if we didn't have pre-grated in the fridge. And sometimes whisking the roux while she consulted the recipe again and again). So, at age 13 or so I was fully introduced into the world of souffles, although I didn't make a souffle on my own until I was about 22. (Being away at school for 8 years wasn't exactly conducive to souffle making.)

In the fall of 2006 I had been itching to make a souffle, and it just so happened that there was a fancy kitchen supply store that was going out of business on Nantucket. It was liquidating its inventory at 70% off, and as a result I bought a souffle dish in just about every size they offered. (I have a habit of doing this. I now have 5 individual-size ramekins, 2 medium dishes and 1 large one. Oops.) I also bought a hand mixer for $2 at the thrift shop, which has make the whole egg white beating process much much easier! After finally procuring the necessary tools, I have made several successful basic cheese souffles, which remain my favorite, and about which I will post at a later date. Tonight I will write about Herbed Potato Souffle, a variation that I ripped out of Food and Wine at some point, which was tonight's dinner. The starch from the potatoes gives a denser and sturdier texture than a regular souffle, so it's a foolproof starting point. When the recipe was published in the magazine it was suggested as a side dish for a Braised Lamb Shoulder, but to be honest, the thought of eating this along side something as heavy as braised lamb makes me feel a little sick. I would suggest serving this along side a generous portion of a lightly dressed green salad and enjoy it as a vegetarian dinner. The original recipe, found here, is for 6, I adjusted the amounts of things somewhat for a recipe that could serve 3-4 depending on your appetites. (Erik and I split it, which I wouldn't recommend, since I still feel grossly full 3 hours later).


Herbed Potato Souffle (adapted from Food & Wine magazine, October 2006)

* 1 1/4 Tablespoons unsalted butter, plus another small pat for greasing the pan
* 1 pound of baking potatoes (2 small-medium potatoes)
* 1/2 cup milk or half & half
* About 1 1/4 cups Cantal or Gruyere cheese, shredded (I actually used Havarti with dill, but it was a little bit wimpy; when I make this again I will use one of the suggested cheeses)
* 1 teaspoon minced fresh oregano
* 1 teaspoon minced fresh thyme
* 1 Tablespoon minced fresh parsley (just realized I forgot this--oops.)
* Salt and pepper to taste
* 3 large eggs, separated
* 2 additional egg whites
* Pinch of cream of tarter (optional--sometimes I use it, sometimes I don't)
* Grated Parmesan cheese--Kraft brand is find, or a few pinches of flour for coating souffle dish

1. Decide if you want to boil or bake your potatoes. I've tried both, but since each instance was so far apart, I don't really know which is better. If you are baking, scrub and prick your potato(es), and bake for about an hour at 400 degrees F. If boiling, peel and quarter your potatoes, cover with cold water in a sauce pan and bring to a boil. Simmer until tender, about 20 minutes.

2. Preheat or reduce-heat(?) your oven to 375 degrees F. Butter and either cheese (my preference!) or flour a 2-quart souffle dish.

3. Back to the potatoes: If you baked your potatoes, slice them open and scoop out the meat into a medium bowl. Eat the potato skins--they are full of good nutrients & stuff. If you boiled your potatoes, drain and return to the saucepan, and dry them out for a minute over high heat, then kill the heat. Add the butter and mash the potatoes. Stir in the milk or half & half. Stir in the grated cheese and herbs, and season with salt & pepper to taste. Stir in the egg yolks and set aside.

4. In a very clean large bowl, whip the egg whites with an electric mixer until foamy. If you have cream of tarter, add a pinch at this point. Continue beating until stiff peaks form.

5. Fold one third of the egg whites into the potato mixture gently. For souffle neophytes, folding in egg whites means, taking a clean rubber spatula and cutting down the middle of the bowl and gently scooping along the bottom of the bowl and folding the potato mixture that you lift up onto the blob of egg whites on top. Keep repeating this motion while rotating the bowl a little each time so that you incorporate all the potato and egg white together and no streaks remain. Gentle is the key word here. You want to maintain as much air in the egg whites as possible for maximum lift. Once you've mixed in a little, add the potato mixture back into the egg white bowl and gently fold everything together until no streaks remain.

5. Gently scrape the mixture into your prepared souffle pan. Bake for 40-45 minutes until the top is puffy and browned. Serve immediately and enjoy!