Tuesday, February 1, 2011

Best. Day. Ever. (Part 1)

 
Today was, as you might have guessed, the best day ever.  Sorry, I've been kind of slacking on the keeping you updated on what I'm doing in culinary school thing.  Truthfully, I'm usually exhausted at the end of the day, and then I have to do homework, and posting just takes me so long that I haven't been keeping up.  But today was so fantastic that I can't keep it to myself. 

So what did we do today?, you're probably wondering.

Answer: Eggs, Cheese, & Dairy.  Happy days.  I will just have to look back on this and remember today when we get to butchering, which will not be the best day.

So we started out by making sweet souffles (as opposed to savory).  Students chose between a Grand Marnier souffle or chocolate; I chose chocolate (obvi).  

 Before the oven

As a seasoned savory souffle maker, I found the process quite straight forward, but I will have to experiment and adapt the recipe a bit before I post it because its written in "cooking school" quantities--i.e., more than you would ever make at home.  However, both the chocolate souffle and Grand Marnier Souffle were great, particularly the Grand Marnier, as it turned out (I think the chocolate souffle needs more chocolate...or at least that's one chocoholic's opinion!)

 My baby coming out of the oven


Digging in

Next: Eggs.  First we watched Chef John demonstrate about eight different ways to prepare eggs, all beautiful and delicious. 

Chef John shows us how it's done

The most interesting to me were shirred eggs, which were eggs cracked into a ramekin filled with pieces of thinly sliced meat (I think it was ham?), dobbed with (lots of) butter, then baked until the eggs were adequately set.  There was so much going on while he was demonstrating that I don't know exactly how long or what temperature, but if I had to guess I'd say about 8 minutes at 375 or 400?  I will have to get back to you on the details of this.  

Shirred Eggs

He also did an individual leek, goat cheese and pesto frittata, which was awesome, and demonstrated both French and American style omelets, which are actually quite different.
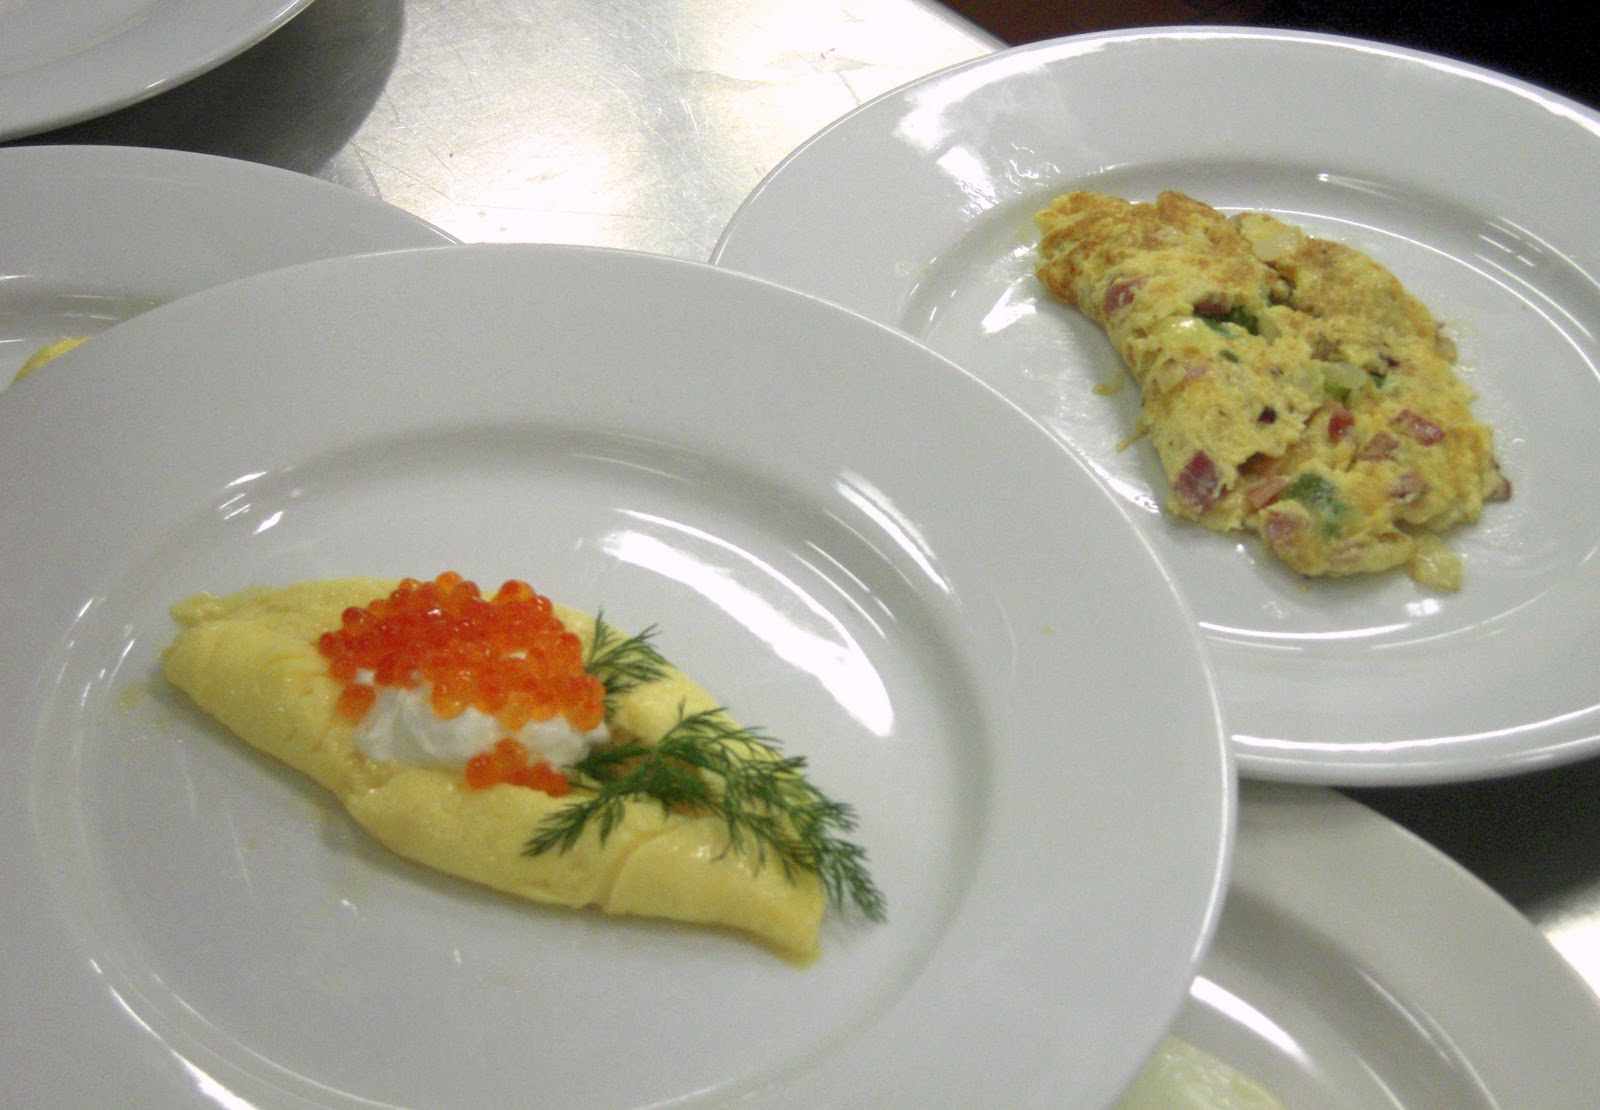
 French omelet with sour cream and caviar (left); American "Denver" omelet (right)

The most interesting thing besides the shirred eggs was a French style dessert omelet, which was just your basic French omelet (I can't do it justice here, you really just need to see someone doing it, but basically you start out in a pan over medium heat, add 2 beaten eggs, then move them around with a spatula almost like you're scrambling the egg, then , when it's mostly set, you leave it alone (except a little bit of jiggling to make sure it isn't sticking or browning), until it's totally set, then you fold one third over, and as you slide it out of the pan you fold the other third over, so the top is nice and smooth.  So once John made a perfect French omelet he filled it with apricot jam before folding it, and sprinkled it with confectioner's sugar, then he took a hot metal skewer (that he had stuck in the gas burner for a minute) and seared three diagonal lines through the sugar.  Beautiful and delicious!  It had never occurred to me to do a sweet omelet, but it was delish :)  

Sweet apricot filled omelet

 The egg dishes multiply faster than bunnies

After John whipped out all these beautiful egg dishes, we set to perfecting our own eggs.  After three takes I produced one decent French omelet, and I also practiced my scrambled eggs (although to be honest, I think I'm already pretty good at those--they are my fave), and then I practiced my over easies, including flipping them with just (several) flick(s) of my wrist.  Here's what I can tell you about flipping eggs using just your wrist: "Don't be afraid!" (in your best Julia Child voice).  And do it over the sink, just in case you miss (but "never apologize!").  My first one I did over too high heat, and it got too crispy and brown, but my second one was quite pretty.  The biggest take away lessons from all of this egg frying/scrambling/omeleting/frittata-ing?  

A sampling of my egg dishes: Over medium, scrambled, and 3 attempts 
at French omelets, getting progressively better from right to left

1. Use the right size pan.  (We were doing all of these individually, in 6 or 7-inch pans, like you would at an upscale restaurant). 

2. Make sure the pan is ridiculously non-stick and/or well seasoned

3. Only cook over moderate heat--browning isn't ideal, except for some American-style omelets

4. Clarified butter.  And lots of it.  (See pic of John, above.  That measuring cup of yellow stuff--butter.)  Clarified butter is regular butter without the milk solids.  To make it you can either melt a hunk of butter gently, then let the milk solids (the white part), sink to the bottom, then skim off from the top.  The part you want to use is the very clear and pure yellow part.  It is ideal for eggs because it doesn't brown or smoke, so it's forgiving if you overheat your pan, and all that jazz.  You can make your own by melting like, a pound of butter then letting the white parts sink and skimming off the yellow part (we go through it like water in cooking class, so we're making our own, often).  Alternatively, you can find in ethnic markets and better supermarkets as ghee, aka, Indian clarified butter.

Ooh, and I poached the most beautiful egg ever, and made it into an egg Benedict sandwich, which was fantastic.  If you are like the old me (before I learned how to poach eggs), you probably don't like poaching eggs, because they get all runny and weird in the water.  But, I found out how to do it well, and I have to say, my first egg was even prettier than Chef John's. So, here are the tricks:

Egg Benedict.  I was so excited I bit into it before I took the picture. 
Sorry.  That black thing on top is a truffle.  Seriously fancy here, people.

1. For every quart of poaching water, you add 1/4 cup of white vinegar.  This sounds like a lot, but it's not, and it's crucial, (you won't even taste it--promise).  DON'T put any salt in your water, it will make the whites run.

2. If you're not using the poached eggs right away, have a bowl of iced salted water set up.  When your eggs are doing cooking, transfer them into the cold water, which will stop the cooking and keep then moist.

3. Pre-crack your eggs into a teacup or other small vessel and use it to slip the egg into the water.  This way it will go in as one whole blob, and you'll avoid having too much "spread" of the whites.

4. Use extremely fresh Grade A eggs--these are the firmest--again, less spread.

5.  Use poaching water that is simmering, just on the verge of a boil.  Barely simmering water isn't quite hot enough, and boiling water will disrupt the eggs.

6. Timing--Most people like eggs poached between 2 1/2 and 3 minutes.  If you are poaching multiple eggs in the same pot, add 10 seconds per egg for each one in the pot (ex., if you're poaching 4 "2 1/2" minute eggs, total cooking time should be about 3 minutes, because you add 10 seconds for each additional egg).  Being the yolk-hating weirdo that I am, I prefer my egg poached closer to 5 minutes, but if you follow the first guidelines--vinegar in the water, proper simmering temp, and pre-cracking your eggs--no matter how long you cook them, they should come out well. 

If your whites do end up spreading a lot, it's totally acceptable to trim up the whites to make them look prettier--or not, whatevs.  I won't judge if you like to quantity over looks.  

So, yeah, that's a lot about eggs.  I probably ate at least half a dozen today.  Good thing I don't have a cholesterol problem (yet).  Hopefully a few of these tricks will help you next time you need to cook an egg, and when I get some more specifics on the souffles, you will be the first to know, I promise!

Stay tuned for part 2 of BEST DAY EVER: Wine and Cheese pairing.  Heaven!


Sunday, January 23, 2011

The Other No-Knead Bread (That I'm Totally Obsessed With)


By now the Jim Lahey, made famous by Mark Bittman/The New York Times "No-Knead Bread" is relatively well known, at least among those who like to bake.  I ripped the recipe of of a newspaper years ago, when it was reprinted, but had never actually made it until a few weeks ago, at first because it requires a Dutch oven, and I didn't have one, and then because I guess I just forgot about it.  But then for Christmas I received Jim Lahey's book My Bread which contains the now-famous recipe, along with multiple variations.  I've now made it twice, and I've been pretty pleased with the results, although I have to say the crust gets SO CRISPY that it's actually difficult to slice!  The inside is amazing and flavorful and full of those nice big holes that make it look fancy, but man, that crust is brutal.  Plus, I have yet to make it without burning the top and bottom, which is frustrating.  I'm not giving up on it just yet, but I needed to give it a rest...

And then, a NEW (very close to) no-knead bread developed by the geniuses at Cook's Illustrated, was brought to my attention by my friend Brad (formerly of TableVibrations, currently slave to medical residency).  The recipe is excessively easy, and is made even easier because the awesome bread blog Breadtopia, has super videos illustrating each step, so it's virtually foolproof.  And so fast.  Honestly, pulling the flour out of the cupboard is the most time consuming part (along with waiting for my painfully slow oven to preheat...)


With good bread, it's all about the crust, the texture, and the flavor.  So first, the crust: it's beautiful.  Picture perfect. Appealingly golden hue, just crispy and crackly enough to make it feel special without taking the edge off your serrated knife.  The texture:  Moist, chewy, but with a tighter crumb (i.e., none of the big holes) than "artisan bread," but hey, nothing falls through that way, right?  Flavor: excellent.  This sounds weird, but it actually uses beer and vinegar to increase the complexity of the flavor, making it quite similar to sourdough bread in fact, without the hassle of sourdough starter.  And while I was a little skeptical as I added the beer and vinegar, I have to say, it really adds something.  Coming from a non-beer drinking family, my options for this step were Heineken and Smuttynose--we had a couple of bottles of each sitting in the pantry.  I opted for the Smuttynose, because it just seemed weird to add Heineken into real food.  I am happy with how it turned out, but I'm open to experimentation in the future.

In the end what really set this recipe apart for me was the fact that it didn't burn when I baked it, the fact that it retained its shape well, making for slices that are big enough (at least in the middle) for sandwiches, and the nicely balanced crust.  

So, if you don't have a Dutch oven already, borrow one, or buy one (you'll be hooked, then you'll really want to have your own!)  And, while we're talking about Dutch ovens, let me say that they come in a huge price range.  A Le Creuset enameled cast iron Dutch oven could set you back a couple hundred dollars, depending on what size you buy.  However, Martha Stewart's cookware line at Macy's has a nearly identical one for much less, and they go on sale fairly often, so if you time it right, you can snag one for $30 or $40.  Lodge Logic is another brand that makes basic, non-enameled pots that are also right in that lower price range of $30 to $40, and can be found on Amazon or in some cookware stores.  I personally like an enameled pot, because it's non reactive, so it can be used for cooking stews and other things with acidic ingredients that could react to cast iron, but that's a whole other discussion.... In any case, grab a Dutch oven, a food scale if you have one (this is SO FAST with a food scale!), stir, wait, knead a few times, wait some more, bake, and you will have amazing bread that you won't believe you made yourself!


Cook's Illustrated (Nearly) No-Knead Bread
Makes 1 perfect loaf

The white and wheat flour recipes are nearly identical, and the process for both is the same.  To watch an awesome video that shows exactly how easy this bread is, click here.

White Flour Recipe:
* 3 cups (15 ounces) all purpose or bread flour
* 1/4 teaspoon instant or rapid-rise yeast
* 1 1/2 teaspoon salt
* 3/4 cup plus 2 Tbs. (7 ounces) water at room temperature
* 1/4 cup plus 2 Tbs. (3 ounces) mild flavored lager
* 1 Tablespoons white vinegar
* Oil Spray, such as PAM

Whole Wheat Recipe:
* 2 cups (10 ounces) all purpose or bread flour
* 1 cup (5 ounces) whole wheat flour
* 1/4 teaspoon instant or rapid-rise yeast
* 1 1/2 teaspoon salt
* 2 Tablespoons honey or raw sugar, such as Sugar in the Raw
* 3/4 cup plus 2 Tablespoons (7 ounces) water at room temperature
* 1/4 cup plus 2 Tablespoons (3 ounces) mild flavored lager
* 1 Tablespoon white vinegar
* Oil Spray, such as PAM

1. In a larger mixing bowl, combine the flour(s), yeast, salt, and sugar or honey (if making whole wheat)

2. Add in the water, beer, and vinegar, and stir until combined.  This dough starts out on the dry side, so you might need to use your hand to finish incorporating the ingredients.

3. Put the bowl in a plastic bag or cover with plastic wrap, and put in a warm, draft free place for 8-18 hours.  (If my kitchen is on the cold side, like, under 70 degrees, I put my dough in the oven with a bowl of hot water that I change a few times, just to create a slightly warmer, more humid environment.  Another trick is to leave your oven light on and the door slightly ajar.

4. After 8-18 hours, turn out your dough onto a lightly floured surface.  Roll the dough around gently to coat with flour so it doesn't stick, then knead it lightly about 10-15 times.  If you're like me and actually like kneading dough, it will be hard to stop, but do, because this dough doesn't need (knead, ha!) your love.  Gather the sides of your dough and pull it towards the center and pinch it together--this creates a nice, smooth exterior for your loaf.  


5. Take a large piece of parchment paper and place it on a cookie sheet or in a skillet.  Place the dough, pinched side down, on the parchment.  Spray the top with your oil spray, and then re-cover it with the plastic wrap or plastic bag.  Allow to rise for an additional 2 hours.  

6.  1 1/2 hours into the second rise, preheat your oven to 500 degrees F, with your Dutch oven inside.  

NOTE: If your Dutch oven has a separate handle that's attached with a screw, unscrew it and plug the hole with a bit of aluminum foil--I know that the Martha Stewart Dutch oven handle is only rated to 450 degrees, and Jim Lahey writes in My Bread that when his recipe was published in the NYTimes, cooking stores reported a rash of petty thefts involving Le Creuset handles, presumably to replace those ruined by the high heat required to bake this bread.  Lodge Logic handles are made of metal, so they should be fine.


Right before you're ready to put your bread in the oven, sprinkle the loaf with flour, and using a razor or a sharp serrated knife, cut a slit about 1/2 inch deep across the middle of the loaf.  When your oven reaches 500 degrees (or as hot as it gets), CAREFULLY pull out the Dutch oven.  Make sure you have a potholder or a trivet down so you have somewhere to put your hot pot!  Lower heat to 425 degrees F.  Gently transfer your bread, on the parchment paper, into the Dutch oven.  


Cover the pot, and then bake for 30 minutes with the lid on.  Remove the lid and bake for an additional 10 minutes uncovered.  (If you have an instant read thermometer, the inside of the loaf should be at least 200 degrees F, but if it's beautiful and golden, then you're probably set :) 
Cool completely on a wire rack before slicing.  Perfect for toast, sandwiches, and snacking.  
Enjoy!!

Wednesday, January 19, 2011

New Chapter

 
Let it be known that today I hacked (several) halibut into chunks with a giant cleaver.  Those of you who know me will realize that this is a fairly odd thing for me to be doing, since I don't like fish, and typically avoid it at all costs.  BUT, what some of you might not know is that yesterday I started culinary school.... so I didn't really have a choice! (About the halibut, that is.)  So, I embraced it a la Julia Child/Julie Powell (from Julie and Juila) and said "Don't be afraid!"

So, Culinary School, eh?  I know most informal food bloggers like myself take pride in the fact that they are self taught and all that, which up until now, I have.  But I had sort reached my limit on my old job (gardening), and so I decided to leave Nantucket and enroll in culinary school at Boston University.  I don't really know what I'm going to do with my new skills, but it seemed like a fun thing to do.  

So far we have made stocks:  Beef/veal, chicken, vegetable, and fish (hence the halibut).  I have to say, I have never bothered with making my own stock; I know that every credible chef says you should, and I acknowledge that, but a) I've never had a big enough pot, and b) it seems like a lot of effort and wasted ingredients (since you throw out the veggies used in the stock afterward).  At least when I buy stock in a carton, I don't have to think about the waste.  But, I will say this: our stocks were pretty darn good.  I'd have to taste a carton stock and our stock side by side in order to see exactly HOW much better homemade is, but my initial reaction was that ours were probably better.

But anyway, I don't intend to change the focus of the blog too much, or get too fancy on you, but I do intend to keep you all updated on any new and interesting things that I learn.  My gem for the day is don't handle halibut if you don't have to.  Okay, okay, maybe I'm biased, but my hands still smell fishy, after washing them at least 10 times, and showering!  Although it was kind of satisfying, except for how I ended up spraying myself with little bits of halibut... But for those of you who have told me that I should open my mind for the sake of my education, I will have you know that I even tasted the fish stock (by accident--I thought it was the chicken!)  It was fishy....

And that's all I have to say about that today.  But I didn't want to withhold my exciting news any longer! 

Tomorrow: Soups!  a.k.a., one of my all time favorite-est foods ever, so I think it will be a good day!

Saturday, January 8, 2011

Symphony in Green

 
...a.k.a.: Lima Bean Puree with Pecorino Romano on Crostini, a.k.a., your new favorite thing that you never knew you were missing .

So I think I ripped this recipe out of the Boston Globe Magazine at some point, although I can't be sure, because it doesn't have a date or any other identifying info on it.  But let me say this: it's good.  Very good.  Very very good.  In fact, the reason I was too full to actually eat the delicious Chard and White Bean Stew that I was cooking simultaneously. 

It took me a while to find frozen lima beans (not quite sure why these are better than canned, but that's what the recipe recommends).  But when you find them, buy them, then make this absolutely fantastic puree.  It is great on its own, but slathered on crostini and topped with a shaving of Pecorino Romano seriously elevates it to heavenly.  I don't even like Pecorino Romano that much on its own (a little too salty and sheep-y tasting for me), but on top of this light, fresh, herby, lemony puree...well, the best thing I can say is the whole is even greater than the sum of its parts.  And the parts are pretty darn good.

So the next time you're throwing a shin dig, and you want an easy and different alternative to hummus or some dull store-bought spread, whip this little baby up.  You'll love it, I promise.


Creamy Lima Bean Puree and Pecorino Romano Crostini (From the Boston Globe Magazine, perhaps?)
Makes About 48 Crostini

* 1 Tablespoon of freshly squeezed lemon juice (from 1/2 a lemon)
* 1/4 cup extra-virgin olive oil
* 1 pound frozen baby lima beans, cooked according to package directions and cooled
* 1 shallot
* 2 teaspoons chopped fresh oregano or about 1 teaspoon dried
* 2 generous Tablespoons of chopped flat leaf parsley
* Salt and freshly ground pepper, to taste
* About 48 crostini, either freshly made or store-bought
* About 48 pieces of shaved Pecorino Romano

1. In a measuring cup, combine the lemon juice, olive oil, and 3 Tablespoons of hot water, set aside.


2. Peel the skin off the shallot and roughly chop into a Cuisinart bowl, fitted with a sharp blade.  Pulse until the shallot is chopped.  Add lima beans, oregano and parsley, pulse until the ingredients are as blended as possible.


3. With the feed tube open and the motor running, add the lemon-oil mixture in a slow, steady stream.  Continue to process for a full minute, stopping to scrap down sides if necessary.  Taste, and adjust with salt, pepper, and more parsley, if desired.  (I ended up adding a little more parsley to bump up the fresh taste).


4.  Allow mixture to stand for at least 30 minutes to let flavors develop, or store in a covered container in the fridge for up to 2 days.  

5. T-1 hour before your fete, spread about 2 teaspoons of spread on top of each crostini, and top with a shave of Pecorino Romano.  The easiest way to get nice shaves of Pecorino Romano is actually with a veggie peeler.  Just run it over the cheese just like a big root vegetable, and you'll get beautiful shaves of cheese.  

Party ready

Enjoy these!  And tell me what you think--part of me thinks I'm crazy for being in love with lima beans, so please justify my new obsession! 

Bean Stew For A Healthy You

 
Well, the 12 days of Christmas are officially over, so I figured I had to move on from Christmas cookies.  Tear.  And on to semi-healthy things, since it's January, and that's how people roll in January, right?  Actually, the fact that this next recipe is on the semi-healthy side is purely coincidental.  I saw it on Smitten Kitchen and it looked absolutely amazing, AND I realized that I had nearly everything I needed in the pantry already, and so that's what I did.  

So, the recipe:  Chard and White Bean Stew.  Doesn't that excite you?  It excites me.  Seriously.  It's full all sorts of yummy things that I love, like beans and tomatoes and garlic and shallots and herbs.  The real bonus was, as I said, all of these things are pantry staples for me, other than the chard.  I made a special pilgrimage to Whole Foods just for that, and for 20 whole minutes felt way too uncool to be there.  Cambridge is just too hip for me...  Anyway, I got home, then whipped this up.  It probably takes about an hour to make, if you're actually paying attention, but I was distracted with several other things, so it probably took me a longer.  But it's great because after you've got all your aromatics chopped and sauteing, you don't really need to pay close attention.  Perfect for cleaning up as you go, or doing other projects that I'll tell you about shortly.

Smitten Kitchen says that the chard can be replaced with kale or spinach or another hearty green, if so desired.  As for serving (which I haven't actually done yet, due to too much snacking while cooking), it can be served as is, or with some fresh herbs or grated Parmesan or Romano on top.  To make it an even more filling and delicious meal, try toasting at thick piece of rustic bread, rubbing it with a clove of garlic, then ladling your stew on top of that, then topping it with a poached egg, then some fresh herbs, few drops of sherry vinegar and/or some grated cheese.  Gosh, I wish I could take credit for that, but I cannot.  But I am definitely doing that tomorrow, once I'm hungry again.  Ooh, golly I just can't wait.


Chard and White Bean Stew (Adapted only slightly from SmittenKitchen.com)
Serves 6 to 8

* 1 pound Swiss chard (or kale, spinach or another green), ribs and stems removed and cleaned
* 3 tablespoons olive oil
* 1 cup (5 1/4 ounces) chopped carrots
* 1 cup (5 ounces) chopped celery
* 1 cup (4 1/4 ounces) chopped shallots, about 4 medium
* 2 large garlic cloves, finely chopped
* 1 cup dry white wine
* 2 15-ounce cans (or about 3 3/4 cups) white beans (such as Navy Beans or Cannellini beans), drained and rinsed
* 2 cups (or more to taste) vegetable broth
* 1 cup pureed tomatoes (canned is fine; this is less than a 15 ounce can)
* Salt and freshly ground black pepper
* 3 fresh thyme sprigs
* 1 bay leaf
* 1 tablespoon sherry vinegar (Red wine vinegar also works in a pinch)
* Garnishes: Toasted bread slices, poached eggs, chopped herbs such as tarragon, parsley or chives or grated Parmesan or Romano, if desired


1. Bring medium pot of salted water to boil. Cook chard (or any heavier green; no need to precook baby spinach) for one minute, then drain and squeeze out as much extra water as possible. Coarsely chop chard.


2. Dry out the medium pot and heat olive oil over medium heat.  Add carrots, celery, shallots and saute for 15 minutes, adding the garlic in the last few minutes.  Light browning is okay, although don't go crazy--you mostly want soft veggies, not crispy ones, and definitely no burnt garlic--bitter city!


3. Add wine (scraping up any bits that may have stuck to the pot) and cook it until it reduced by three-fourths. 


 4. Add beans, broth, tomatoes, a few pinches of salt, freshly ground black pepper, thyme and bay leaf and bring to a boil. Reduce heat to medium-low and simmer for 20 minutes. Add chard and cook for 5 minutes more. Remove thyme and bay leaf. Add more broth if you’d like a thinner stew and adjust salt and pepper to taste.


5. Serve as is drizzled with sherry vinegar. Or try the aforementioned toast/stew/egg/cheese/sherry vinegar combo.

Enjoy!

Saturday, December 25, 2010

Never Too Late For Christmas Cookies

 
Hello December, goodbye December.  Well, maybe not goodbye just yet, but wow, only a week left?  That went fast!  Here's what I've been doing this December: Not cooking.  Packing.  Moving.  Unpacking.  Eating catered food.  Way too much of it.  More not cooking.  Unwrapping a ridiculous number of new cookbooks(!!!).  Here's what I'll be doing very soon: Cooking!  And blogging again!  And joining a gym.  I need that right about now. 

Probably a number of you know this, but I'll fill in those who don't.  I finished my gardening job, left Nantucket (*tear) last Monday.  Moved back in with the 'rents in Boston.  Why? you ask.  Well, I'll tell you: Starting culinary school in January!  Blogging has fallen by the wayside these past three weeks due to the packing and moving and holiday parties, not to mention many late-night Christmas hat knitting sessions/Jane Austen movie marathons that often occur for me right before the holidays.  And even if I had had time to write, I didn't think you'd care to hear about the multiple nights of scrambled eggs and salsa for dinner, or any of the other bizarre food combos I came up while attempting to only eat out of my pantry to minimize the amount of stuff I had to move.

Then I got home, and even thought I left about 5/6ths of my stuff in boxes in my parents' garage, it took a full 2 days to unpack the remaining 1/6, with ample breaks for Christmas cookie baking.  Which, let's be honest: was a lot more fun that the unpacking part. 

Every year I bake the cookies for my family's Christmas party.  I've tried different kinds of cookies over the years, which have mostly been good, but generally too plentiful.  So this year I decided to go minimal (only 3 kinds instead of 4 or 5), and I actually returned to 2 favorite cookies that I had made in years past, in part because they are good enough to warrant revisiting, but mostly because I've been too busy justify spending time searching out new recipes.  Incidentally, the 2 cookies that I returned to were 2 that I had made the first year my parents lived in their new condo, aka, the year that everything I attempted to bake was a disaster.  I remember sending my friend Liz of Baked By Liz an email that year, detailing all of my frustrations with the new kitchen, which basically went something like this:

....The ovens are tiny, I had to buy all new mini cookie sheets, I can only bake one batch of cookies at a time, and if I try to use both ovens at once (they are double ovens), all hell breaks loose.  One runs way hot, the other runs way cold, and everything either turns out rock hard, or else never bakes.  I had to throw out dozens and dozens of cookies, and a cake, and start again from scratch, this time with oven thermometers....which have helped, slightly.

Luckily, this being the 3rd holiday season in the not-as-new-anymore condo, I have gotten slightly better at the ovens.  Here's the trick: OVEN THERMOMETERS!  Have I sung their praises lately?  Also, accepting the fact that the ovens misbehave terribly when both are on at the same time, accepting that you can only reliably use one at a time, and since they are the smallest ovens you will ever see, realizing you can only bake about 10 cookies at once.  Which, when you're baking for a party of 60 people...can take a while.  So never try to do anything quickly.  My game plan was to make the three cookies doughs at night, and then roll and bake the cookies the following day, when I had ample time to do so.  Incidentally all 3 cookies that I chose were ones with doughs that took well to refrigeration (and in the case of one, actually required it).  They all get rolled into shape, dipped into sugars, and then baked, although I didn't even notice the similarities in their methods until I was well underway.  A few cookies in I decided that it would be more efficient to weigh out each cookie, which sounds completely compulsive, and probably is, but actually was a lot easier than trying to eyeball their sizes.  I set my electric scale to grams, which is the smallest increment, and decided, after weighing a few dough balls, that 20 grams was an ideal weight for each cookie.  After a few, I was actually scooping out pieces of dough that were nearly perfect, but it was nice not to have to even them out at the end, taking a little pinch of dough off one and adding it to another.  I liked the peace of mind, knowing they were all identical so that they would all look the same, and bake up perfectly; in the future I will always use this technique.

So now that I've told you at length about how the cookies were make and weighed and baked, perhaps I should tell you what they actually are, before Christmas is over (2 hours, I can do this!). 

In perceived order of popularity (based on how many of each were left after the party):

3rd place:  Molasses Gingerbread Cookies

2nd place: Espresso Crinkles

1st place: Mexican Wedding Cookies

Incidentally, the fewer the ingredients, the more popular the cookie.  Although I suspect my completely unscientific observations were thrown off by the fact that the gingerbread ones were in the room where fewer guests were mingling, whereas the other two were in the room where about 90% of the guests were mingling.  Just a guess.  But in my opinion, all were delicious and all will be made again.  And so, without further ado, the recipes. 


Molasses Gingerbread Cookies (Adapted, only slightly, from the Whole Foods website)
Makes about 30 cookies

* 2 1/4 cups all purpose flour
* 2 teaspoons baking soda
* 1/2 teaspoon salt
* 1 1/2 teaspoons ground cinnamon
* 1 teaspoon ground ginger
* 3/4 teaspoon ground cloves
* 3/4 teaspoon allspice
* 3/4 cup (1 1/2 sticks) unsalted butter, at room temperature
* 1/2 cup packed brown sugar
* 1/2 cup plus 1/3 cup granulated sugar 
* 1 egg
* 1 teaspoon vanilla extract
* 1/3 cup unsulphured molasses
* Zest of 1 orange


1. Preheat oven to 375°F. In medium bowl, whisk together flour, baking soda, salt, cinnamon, ginger, cloves and allspice; set aside.

2. In a large bowl, cream together butter, brown sugar and 1/2 cup of the granulated sugar with an electric mixer on medium speed until light and fluffy, scraping down sides of bowl with a rubber spatula. Add egg, vanilla and molasses and beat until combined. While continuing to beat on low speed, add flour mixture and beat just until combined. 

Ali creams the butter and sugar together in style


3. Combine the remaining 1/3 cup granulated sugar and orange zest in a shallow bowl. To form each cookie, roll a scant 2 tablespoons of the dough into a 1 1/4-inch ball, (If you have an electronic scale, 20 grams is an ideal weight for each cookie).  Then roll in sugar mixture and transfer to ungreased baking sheets (lined with parchment paper, if you have it) spacing cookies about 2 inches apart. 

4. Bake until outer edges begin to set and centers are soft and puffy, 9 to 11 minutes. Cool for 2 to 3 minutes, then transfer to cooling racks and set aside to let cool completely.  Store in airtight containers if you're not serving these right away, to maintain softness.  


Espresso Crinkles (Adapted, only slightly, from Cooking Light, December 2008)
Makes about 24 cookies

My only real change to these cookies is to melt the chocolate in a mixing bowl over a double boiler instead of in a sauce pan and then transferring it to a bowl, thereby saving one dirty dish.  I also used a whole egg instead of 2 egg whiles--a little fattier, but less waste.  Either way is fine, though.  My only other tip is to make sure you don't over-bake them--at their best they are soft and chewy inside, just like a dense, fudge-y brownie.  Delish!

* 4.5 ounces all-purpose flour (about 1 cup)
* 1 1/4 cups powdered sugar, divided
* 1/4 cup unsweetened cocoa
* 1 1/4 teaspoons baking powder
* 1/8 teaspoon salt
* 5 1/4 teaspoons canola oil
* 1 1/2 ounces unsweetened chocolate, chopped
* 1 teaspoon instant espresso granules
* 3/4 cup packed brown sugar
* 3 tablespoons light-colored corn syrup
* 1 1/2 teaspoons vanilla extract
* 1 large egg or 2 large egg whites

1. Weigh or lightly spoon flour into dry measuring cups; level with a knife.  Sift together flour, 3/4 of a cup of powdered sugar, cocoa, baking powder, and salt in a medium bowl.

2. Combine oil and chocolate in a glass or metal bowl and set up a double boiler over a small saucepan over low heat; heat until chocolate melts, stirring constantly. Add espresso granules to pan; stir until blended. Remove from heat and allow chocolate mixture to cool 5 minutes. Stir in brown sugar, syrup, and vanilla. Add egg or egg whites, stirring with a whisk. Add flour mixture to egg mixture, stirring gently just until combined. Cover; chill at least 2 hours or overnight.

3. Preheat oven to 350° F.

Arranging the Espresso Crinkles...not in style.

 \4. Roll dough into 1-inch balls (If you have an electronic scale, 20 grams is an ideal weight for the dough balls).  Dredge balls in remaining 1/2 cup powdered sugar; place balls 2 inches apart on 2 baking sheets lined with parchment paper. Bake at 350° for 10 minutes or until tops are cracked and almost set. Cool cookies on pan 2 minutes or until set; remove from pan. Cool cookies on a wire rack.

Espresso Crinkles, waiting to go into the oven


Mexican Wedding Cookies (From Paula Deen, of the Food Network)
Makes about 3 dozen cookies

These incredibly simple cookies are divine as they crumble gently when you bite into them then melt on your tongue.  Five ingredients have never come together so beautifully before, let me assure you!  A mini Cuisinart is an ideal tool for chopping the pecans, but you can also do it with a nice big knife if that's all you have. 


* 1 cup (2 sticks) unsalted butter, at room temperature
* 1/2 cup confectioners’ sugar, plus more for coating baked cookies
* 1 teaspoon vanilla extract
* 1 3/4 cups all-purpose flour, plus more for dusting hands
* 1 cup pecans, finely chopped


1. Preheat the oven to 275 degrees F. Line cookie sheets with parchment paper.

2. Using an electric mixer, cream the butter and sugar together at low speed until it is smooth. Beat in the vanilla. At low speed gradually add the flour. Mix in the pecans with a spatula.

3. With floured hands, take out about 1 tablespoon of dough, roll it into a short log with slightly tapered ends, then shape into a crescent. Continue to dust hands with flour as you make more cookies. Place onto prepared cookie sheets. Bake for 30-35 minutes, until very lightly browned. When cool enough to handle but still warm, roll in additional confectioners' sugar, until completely coated.  (I found that my first layer of sugar melted and formed almost a sugar frosting on the cookies, so I dredged them again when they were cooler to get a nice (albeit messy!) powdery finish on them.  Cool on wire racks.

 Mexican Wedding Cookies and Molasses Gingerbread Cookies 
plated, just waiting on the Espresso Crinkles

Enjoy these cookies any time of the year, but for now let me wish you a very Merry Christmas!

Saturday, December 4, 2010

Genius!

  
I wasn't planning on writing anything tonight, but then I made dinner, and it was just so darn good that I felt a little selfish keeping it to myself, even though the recipe is really rough, and I just kinda made it up, and I can't even tell you exactly what I did.  But bear with me, and I'll give it my best shot. 

So, I had some pre-cut butternut squash sitting around from before Thanksgiving, and it has been getting moldy and squishy all week, because I haven't had the time/energy to use it.  And I also had a few apples from the bottom of one of those supermarket bags of apples that were totally bruised and not much good for eating.  A promising start, no? 

A few weeks ago I made this fantastic Barefoot Contessa salad (again from Back to Basics, a.k.a., my new favorite book).  The recipe is here if you want to make it, and. quite honestly, you should.  But back to tonight.  I decided to roast the squash exactly like I did for that salad, which is to say, with EVOO, a touch of maple syrup, salt and pepper.  Once I picked through my squash and got rid of all the bad bits, I probably had about 2 cups of diced pieces.  I peeled and cut the apples into eights, and then tossed it all together, then roasted them until the squash was soft, and the apples were very soft but SO AMAZING.  (I'm going to have to look further into this roasted apple thing, because holy cow people, they were sooooooo good.  I probably would have had more soup if I hadn't eaten so many apple pieces right out of the roasting pan!)  I then pureed the roasted stuff with just enough vegetable stock to help them move around, and then I stirred in a little more, to make it the ideal consistency, and presto, dinner is served.  It was earthy, sweet, tart, and just a tiny bit spicy, and woweeee.  When this idea formulated in my mind I thought that it would need a dash of half and half to give it a little richness, but honestly the roasted vegetables came out like silk in the blender, and when I tried adding the half and half it ended up masking the tangy tartness of the apples, which I think really made the dish.  And without it the dish is Vegan, which I think is pretty cool.  Not that I'm a Vegan, or even a strict vegetarian, but I like to challenge myself to cook with restrictions sometimes, just to see if I can do it.  And in this case, I can, and I will be making it again, and soon--I won't even wait until my ingredients are so-close-to-rotten-that-I-have-no-other-option-than-to-roast-and-puree-them-to-hide-their-flaws.

P.S.  Fruits and veggies, people!  I nearly forgot to mention, I ate 4 apples and several cups of squash for dinner and it was so good I felt like singing!  Got all my servings today!  And, only 5 ingredients; Claire Robinson, eat your heart out!


Butternut Squash and Apple Bisque
Serves as many as you want

As mentioned above, I basically used what I had around, which was 4 small/medium apples and about 2 cups, diced, of squash (although I probably ate about 1 apple's worth of pieces before making the soup, so more like 3 apples.  This made one large dinner serving, so you can use this ratio to make your desired quantity. 

For each serving:

* 3 smallish/2 larger apples, peeled/cored and cut into eight wedges (As it so happened, I had Cortlands, which are excellent cooking apples, because they hold their shape and have a bit of tartness, which really came through in this soup, so I would highly recommend Cortlands if you can get your hands on them) 
* 2 cups of butternut squash, diced into 3/4-inch pieces
* A few swirls of extra virgin olive oil, enough to coat ingredients lightly
* A few tablespoons of pure maple syrup
* Salt and pepper
* Vegetable stock, about a 1/4 to 1/2 a cup per serving

1. Preheat your oven to 400 degrees F.  Line a cookie sheet (or 2, if you have a lot of apple/squash), with aluminum foil (for easy cleanup).  In large bowl, toss the squash, apples, olive oil, and maple syrup, until the veg/fruit is evenly coated.  Pour out in a single layer on your cookie sheet(s).  Sprinkle with kosher or sea salt and freshly ground pepper

2.  Roast veg/fruit until the squash is quite soft and apples begin to get nice brown bits, about 20-25 minutes. 

3.  Allow to cool for a few minutes, then put veg/fruit in a blender (in batches, if necessary), with just a few splashes of vegetable stock.  Puree until smooth; use a spoon to move things around if necessary.  Add additional vegetable stock until soup reaches the desired consistency.  Adjust seasoning with salt and pepper, if you need to.  Transfer into a saucepan to reheat if necessary, or just pour into bowls and serve.

As you can see, I like my soup thick.  I'm getting hungry again just thinking about it.

Enjoy!!!