
Wednesday, March 2, 2011
All I Have to Say on The Subject of Gluten-Free Baking....
....is be glad you don't have Celiac's disease. Or if you do, I'm sorry to hear that, but thank you for reading my blog despite it.
Today we learned a little bit about baking sans gluten. While the things we made weren't bad, per se, they lacked a certain something...what was it...mmm...oh, right: gluten. Man, you never think about that stuff until it's gone. Then you're thinking, "Mmm..this is interesting. But so not chewy, delicious and satisfying like I was expecting. And kinda gritty, too."
I'm so new to this gluten-free that I can't really say which ingredient causes the textural change, since gluten-free flours vary in composition. We used King Arthur Multi-Purpose Flour, which is a mix of white and brown rice flours, and tapioca and potato starches. It's also possible to find potato flour, garbanzo bean flour, and I'm sure a whole host of others, but apparently this King Arthur Flour mix is a good product, or so we were told. We used it to make sugar cookies, brownies, chicken pot pie, and pizza dough. The sugar cookies had good flavor (we used lots of lemon zest!), but they were a bit gritty--not soft and buttery the way sugar cookies often are. After about 2 (they were small, I swear), I was feeling like I had sand in my teeth. (AND! I should point out that of the FIVE batches of dough collectively produced by the class, only ONE actually produced cookies that looked/baked the way they were supposed to, which means that this recipe is fu-ssy!) The brownies were fine, but quite cakey, despite the generous amount of egg, butter, and chocolate used. If, in a pinch, I needed gluten-free brownies I'd be tempted to just replace the flour in Ina's Outrageous Brownies, withe a gluten-free mix, because I think they'd be richer than the ones we made were. The chicken pot pie had good flavor (from all the yummy veggies & herbs in the filling), but again, the crust just dissolved like sand, it lacked that satisfying, well, doughiness, that I associate with pot pies. Finally, the pizza crust was just a bit thick and oily, although I will say that my classmates who prepared the sample did a first rate job. While the crust was kinda blah, the tomato sauce was excellent!
So, that's all I have to say on that for tonight. If you do happen to be gluten-intolerant, and you want some of these recipes, I will be happy to share, just let me know in a comment! Otherwise, I will be back with more yummy, gluten-y stuff in the near future!


Wednesday, February 16, 2011
[Heart] Sausage
Once again, I'm holding out on recipes on your guys. Sorry about that. I just wanted to say that (well made) homemade sausage is AMAZING.

Meat Grinding
Today we made sausage with Jamie Bissonnette, chef/owner of Boston's Toro and Coppa, both fantastic restaurants in the South End. My sister Ali and I had a great dinner at Coppa in January, and I haven't been to Toro yet, but it has been highly recommended to me by multiple sources. The only reason I haven't been yet is because I hear the lines are out the door, and it's too cold right now to wait!

Cleaning the casing. I think these were pig intestines?
Jamie showed us how to make a bunch of different meaty things, with each group tackling 2 different projects. Of all the thing that we made, my favorites were the Italian-style pork sausage and the Southeast Asian-influenced chicken and pork sausage patties. Other dishes included a chicken liver mousse, salt cod fritters, Merguez, which is a Spanish/north African lamb and pork sausage, and Rillette an interesting cooked pork and vegetable spread, which truthfully I found a little bizarre. The process was actually far less gross than I was expecting (at least I can guarantee that our sausages do not contain any suspect animal parts), and the taste and texture, particularly of the Italian sausage, was beyond compare.

Squeezing out the sausage
Anyway, I'm not giving you recipes for 2 reasons: 1) I don't actually have them. We just kind of winged everything (and by we, I mean, Jamie told us how to wing it, and we did what he said, and 2) I'm pretty sure that you don't have the equipment that needed (meat grinder, sausage stuffer), or access to the supplies (multiple pounds of meat, intestines for casings, etc.) Sadly, I don't think I'll be able to recreate this lesson, at least on the scale that we did it, at home for the aforementioned reasons, but I'm glad I got to try it once!

Surveying our creations. In the foreground are the chicken
sausage patties, then the Italian sausage, casserole full of Rillette,
bread with chicken liver mousse, duck leg confit, and the Spanish/
North African Merguez sausages all the way at the end!
Thursday, February 10, 2011
My Hero(s)
I have recipes to share with you, but no time to do it right now! I will get back to the food part of the food blog soon, I promise!
I just wanted to share (read: brag) that tonight I got to meet my food hero, Mark Bittman, IN PERSON. We shook hands, and then I gushed foolishly, all the while blushing madly, about how much I like him and how influential his writing has been to my whole approach to food. It was exciting. Except that I forgot to bring one of his books to have him sign. Alas.
Listening to him lecture on food sustainability and the environmental and personal health benefits of plant based diets was particularly timely because today in class we were discussing sustainability and vegetables with Michael Leviton, a well respected chef in the Boston area whose restaurant, Lumiere, (which I have not had the chance to eat at--yet!) really emphasizes local and sustainably raised produce. It's on the late side, so I won't wax poetic right now, but it was interesting to hear about local (Boston/New England) food sustainability from someone who spends so much time thinking about, researching, and supporting local sustainable farming and agriculture.
In other news, we've reached a point in the semester, rather quickly, when we've had enough different instructors telling us their own (often conflicting!) view points, to the point now where it's hard to know what to think! Chef John warned us this would happen, and so it has... Yesterday one chef declared "grass fed beef is crap!" or something to that effect, whereas today we taste tested grass fed and good quality Whole Foods (but not specifically grass fed) beef, both pieces cooked identically and completely unseasoned, and across the board everyone preferred the grass fed...so go figure. And then the discussion on whether or not to truss your roast chicken went on so long I nearly missed Mark! What I'm quickly discovering is that while it's great to have a lot of different, talented, respected, opinionated instructors---I will probably never be 100% certain what the "right way" to do anything is, be it chop garlic or roast a chicken. Oh well. With any luck I will feel confident enough in my skills at some point that I can make the rules!
So that's the cooking school update for now. Tomorrow, after class, NYC for Dorie Greenspan's CookieBar, a pop up shop that she's doing this week. Sooo excited! And then when I get back I will finally post about Dorie's World Peace cookies, which are ammmmmazing. You will not be disappointed. (I would have written about them sooner, except my family ate them all before I had time for pics--yeah, that's how good they are!)
Tuesday, February 1, 2011
Best. Day. Ever. (Part 2)
So, after we ate ourselves silly on eggs, there was the wine and cheese pairing/tasting part of class. I know, you're already jealous.

The lineup
We sampled 5 wines and cheese pairs, all French, and all paired based on the notion of "terroir." Loosely translated as "a sense of place," terroir denotes the idea that the shared geography, geology, climate, and farming techniques of agricultural regions give the wine and food produced unique, shared characteristics. More simply, as we say in English "what grows together goes together." The five cheeses represented five different areas of France, and the wines with which they were paired we from the same region, and complemented their flavors superbly.

Though I've been aware of the concept of food and wine pairing, I never taken it seriously. Occasionally I'll notice if something tastes really good together (when I cause that to happen, it's always just a lucky coincidence). More often I will notice that a wine that I enjoy before dinner will take on a harsh or astringent taste with food, probably due to exceptionally bad pairing on my part. The first time I actually had a restaurant meal with wine pairings was just a few weeks ago, and I kept marveling at how good everything was together, particularly because all the the wines for the meal were things that I would have never chosen on my own. With this recent experience in mind, I was very excited to sample two things that I love (wine & cheese), paired!

We started with a simple Chevre log paired with Sancerre. The bottle we drank was Henri Bourgeois Les Bonnes Bouches 2009. Both the wine and the cheese were from the Loire region of France. The chevre was creamy and slightly tangy, while the wine was very light and fruity. We started by taking a bit of the cheese in our mouths, and letting it melt on our tongues a bit, really tasting it but not swallowing it. Then we took a sip of wine, and let the flavors mix in our mouths, tasting how the cheese and the wine complement each other.

Serious wine & cheese contemplating underway...
Next we sampled L'Explorateur cheese with a White Burgundy, which are produced in adjacent regions (the former from the Ile-de-France region, the latter from Burgundy, as you may have guessed). L'Explorateur is a triple-cream cheese, which means it's about 75% butterfat, and thus is out of this world creamy, smooth, and delicious. We spread the L'Explorateur on Stoned Wheat Thin crackers--there was some logic for this, but unfortunately I can't remember what is is, other than that it tasted good. Likewise, I can't remember what the wine was like, other than I wrote in my notes "quite good." The wine was Olivier Leflaive Bourgogne Blanc Les Setilles 2008. Just so I don't sound totally clueless, I googled it, and found this review from one wine vendor: "A very fresh and intensely floral nose also reflects hints of lemon-lime and earth, both of which can also be found on the nicely rich and round flavors that are not only intense and delicious but also deliver better than average complexity." So that's a little bit more descriptive than my "quite good" note...
Third was Epoisse, with a red Burgundy. Epoisse, for those non-tyrophiles out there (that's my new word, it means "one who loves cheese"), is one of those fantastically stinky cheeses--not quite in Limburger territory, but not far off. When it's quite ripe it literally runs and oozes when you cut into it; ours was a few weeks shy of completely ripe, so it was a bit more manageable stinkiness-wise, and a bit firmer in the center, although still creamy. You don't eat the orange rind, whose color comes from the Burgundy wine with which its washed. However, the inside pairs well with sweet-tart dried cherries. We took a bite of cheese and cherry, and let the flavors sit in our mouths while we swished our Burgundy wine around--amazing. While I appreciated Epoisse before, this way of tasting it has increased my enjoyment so much more! (Probably helped too that the cheese was not quite as over-ripe as my dad likes to serve it!) The Burgundy that we tried was Domaine Fribourg Closerie Des Alisiers Bourgogne Hautes-Cotes de Nuits 2009. I liked this wine okay, but I think if I ever recreated this tasting, I'd find a different Bourgogne.
Fourth was Emmentaler with Cotes du Rhone. Emmentaler, the original Swiss Cheese, is a firm, mild cheese, with the subtlest spicy aftertaste, as well as a faint nuttiness, which we enhanced by eating it with walnuts. As someone who likes slightly stronger cheeses, I found the Emmentaler to be a little dull, but I can appreciate how it fit into the cheese tasting due to its flavor and texture. And, with the wine, Clos du Mont-Olivet Cotes du Rhone Monteil-la-Levade 2008, and the walnut, it certainly took on more interest than it had on its own. The wine was a beautiful dark red, and while I can't remember how it tasted, I didn't write anything bad in my margins, so it must have been okay!
Finally, my favorite wine (Sauternes!), with my least favorite cheese (Roquefort...). But add some pear, and hot damn, I actually found something new to like! For me it was the most eye opening pairing, since I am a huge Sauternes fan (chalk it up to my insatiable sweet tooth), but generally not a fan of blue cheeses (too potent and moldy tasting). However, with the sweet, creamy Bosc pear slice, and the honey-like sweetness of the wine, the pungency of the Roquefort was nicely tempered. I don't think I'm going to be putting it on everything, but I see that in the right situation it can be quite enjoyable. Oh, and for those who don't know, Sauternes is a very sweet, often expensive, fortified dessert wine. Most people find it painfully sweet, but not this girl. We tried Castelnau de Suduirant 2003, a "deuxieme vin," (the Chateau's 2nd tier bottle) but still pretty tasty. Roquefort and Sauternes both hail from Bordeaux, making them a good pairing in this terroir exercise, and this particular bottle wasn't too expensive for a Sauternes, but for generally more pocket book friendly alternative, Chef John suggests an Orange Muscat, such as Quady Essensia Orange Muscat.

The damage.
Finally, we experimented by tasting wines and cheeses that weren't meant to go together, just to understand how a good pairing and a bad pairing can really change your experience with certain wines and foods. I tried the Sauternes with the Chevre, and while I love both things on their own, together they were kinda funky, not gonna lie... I also tried the Sancerre, my next favorite wine of the group, with the Epoisse--again, a little bit off. Then I just snacked on the dried cherries, because they were so good! The takeaway from this lesson is that a) Cheese is good. b) Wine is good. c) Together they can be fantastic, or weird, depending, so pair well! If you are lucky enough to live in Boston, check out Formaggio Kitchen in Cambridge or the South End--the cheeses there are fantastic and the staff is beyond knowledgeable. For further reading from Chef John, check out his feature of having a wine and cheese tasting on his website.
And again, I've rambled on too long, so I must be off to do my reading for tomorrow!
Best. Day. Ever. (Part 1)
Today was, as you might have guessed, the best day ever. Sorry, I've been kind of slacking on the keeping you updated on what I'm doing in culinary school thing. Truthfully, I'm usually exhausted at the end of the day, and then I have to do homework, and posting just takes me so long that I haven't been keeping up. But today was so fantastic that I can't keep it to myself.
So what did we do today?, you're probably wondering.
Answer: Eggs, Cheese, & Dairy. Happy days. I will just have to look back on this and remember today when we get to butchering, which will not be the best day.
So we started out by making sweet souffles (as opposed to savory). Students chose between a Grand Marnier souffle or chocolate; I chose chocolate (obvi).

Before the oven
As a seasoned savory souffle maker, I found the process quite straight forward, but I will have to experiment and adapt the recipe a bit before I post it because its written in "cooking school" quantities--i.e., more than you would ever make at home. However, both the chocolate souffle and Grand Marnier Souffle were great, particularly the Grand Marnier, as it turned out (I think the chocolate souffle needs more chocolate...or at least that's one chocoholic's opinion!)

My baby coming out of the oven


Digging in
Next: Eggs. First we watched Chef John demonstrate about eight different ways to prepare eggs, all beautiful and delicious.

Chef John shows us how it's done
The most interesting to me were shirred eggs, which were eggs cracked into a ramekin filled with pieces of thinly sliced meat (I think it was ham?), dobbed with (lots of) butter, then baked until the eggs were adequately set. There was so much going on while he was demonstrating that I don't know exactly how long or what temperature, but if I had to guess I'd say about 8 minutes at 375 or 400? I will have to get back to you on the details of this.

Shirred Eggs
He also did an individual leek, goat cheese and pesto frittata, which was awesome, and demonstrated both French and American style omelets, which are actually quite different.
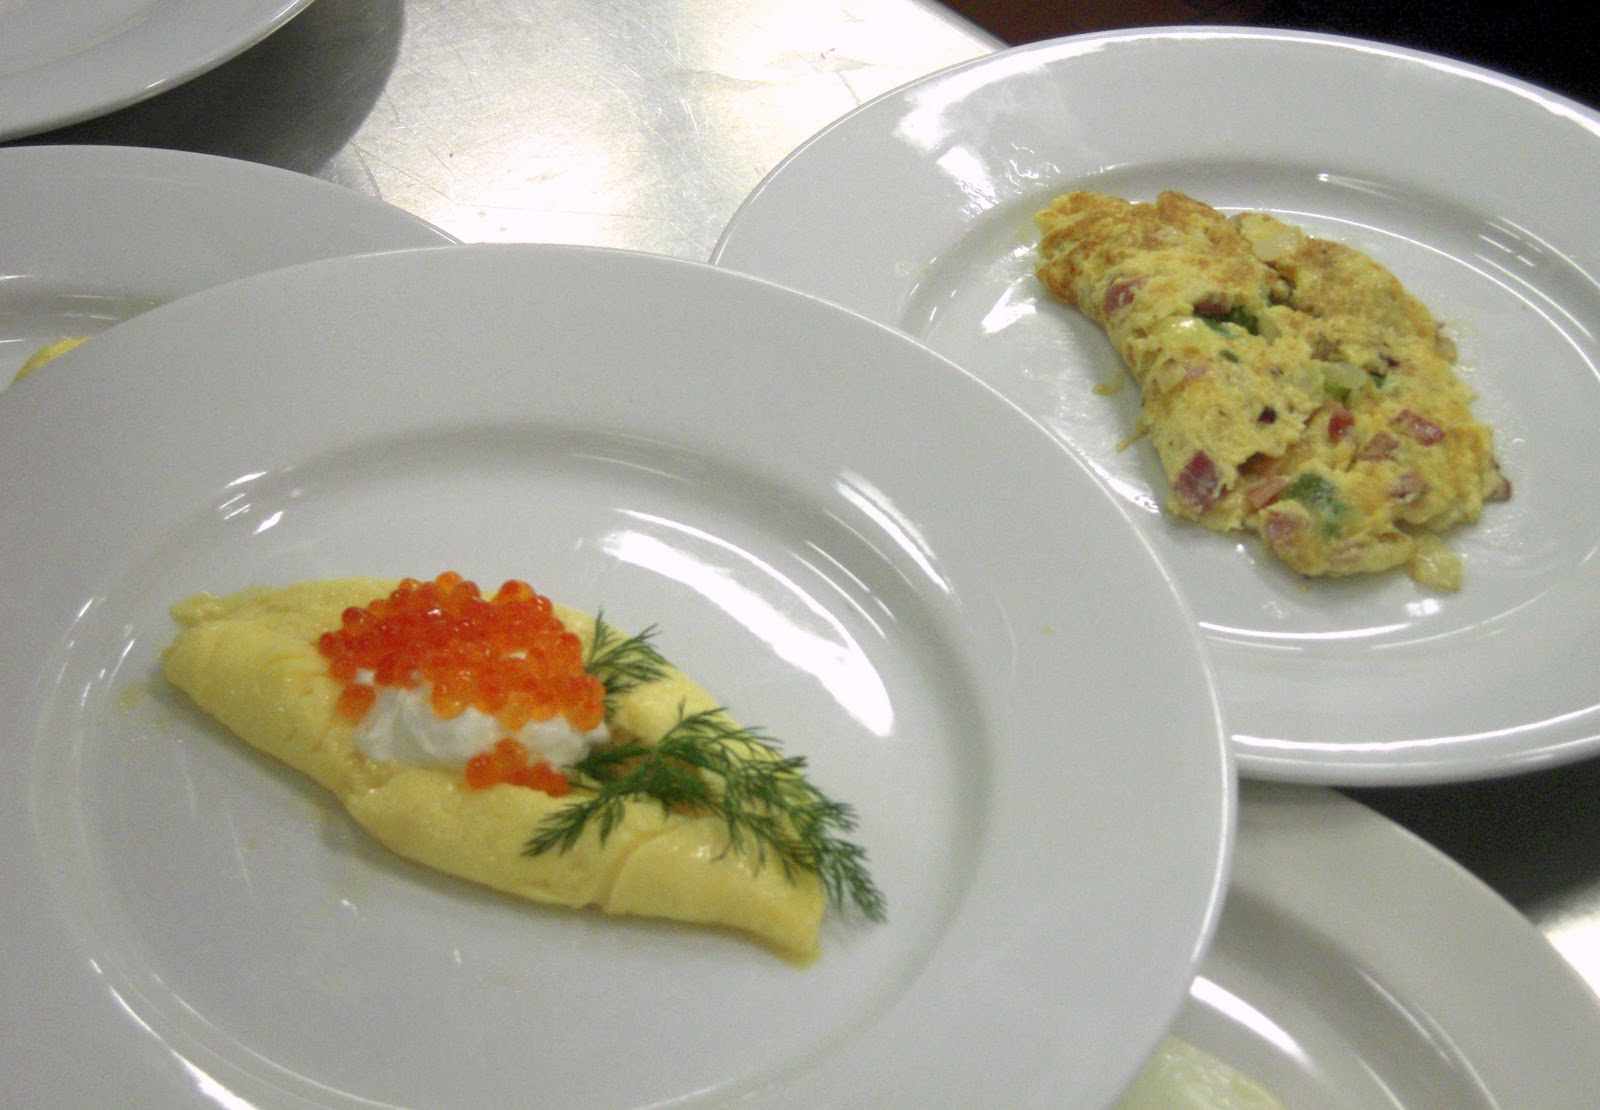
French omelet with sour cream and caviar (left); American "Denver" omelet (right)
The most interesting thing besides the shirred eggs was a French style dessert omelet, which was just your basic French omelet (I can't do it justice here, you really just need to see someone doing it, but basically you start out in a pan over medium heat, add 2 beaten eggs, then move them around with a spatula almost like you're scrambling the egg, then , when it's mostly set, you leave it alone (except a little bit of jiggling to make sure it isn't sticking or browning), until it's totally set, then you fold one third over, and as you slide it out of the pan you fold the other third over, so the top is nice and smooth. So once John made a perfect French omelet he filled it with apricot jam before folding it, and sprinkled it with confectioner's sugar, then he took a hot metal skewer (that he had stuck in the gas burner for a minute) and seared three diagonal lines through the sugar. Beautiful and delicious! It had never occurred to me to do a sweet omelet, but it was delish :)

Sweet apricot filled omelet

The egg dishes multiply faster than bunnies
After John whipped out all these beautiful egg dishes, we set to perfecting our own eggs. After three takes I produced one decent French omelet, and I also practiced my scrambled eggs (although to be honest, I think I'm already pretty good at those--they are my fave), and then I practiced my over easies, including flipping them with just (several) flick(s) of my wrist. Here's what I can tell you about flipping eggs using just your wrist: "Don't be afraid!" (in your best Julia Child voice). And do it over the sink, just in case you miss (but "never apologize!"). My first one I did over too high heat, and it got too crispy and brown, but my second one was quite pretty. The biggest take away lessons from all of this egg frying/scrambling/omeleting/frittata-ing?

A sampling of my egg dishes: Over medium, scrambled, and 3 attempts
at French omelets, getting progressively better from right to left
1. Use the right size pan. (We were doing all of these individually, in 6 or 7-inch pans, like you would at an upscale restaurant).
2. Make sure the pan is ridiculously non-stick and/or well seasoned
3. Only cook over moderate heat--browning isn't ideal, except for some American-style omelets
4. Clarified butter. And lots of it. (See pic of John, above. That measuring cup of yellow stuff--butter.) Clarified butter is regular butter without the milk solids. To make it you can either melt a hunk of butter gently, then let the milk solids (the white part), sink to the bottom, then skim off from the top. The part you want to use is the very clear and pure yellow part. It is ideal for eggs because it doesn't brown or smoke, so it's forgiving if you overheat your pan, and all that jazz. You can make your own by melting like, a pound of butter then letting the white parts sink and skimming off the yellow part (we go through it like water in cooking class, so we're making our own, often). Alternatively, you can find in ethnic markets and better supermarkets as ghee, aka, Indian clarified butter.
Ooh, and I poached the most beautiful egg ever, and made it into an egg Benedict sandwich, which was fantastic. If you are like the old me (before I learned how to poach eggs), you probably don't like poaching eggs, because they get all runny and weird in the water. But, I found out how to do it well, and I have to say, my first egg was even prettier than Chef John's. So, here are the tricks:

Egg Benedict. I was so excited I bit into it before I took the picture.
Sorry. That black thing on top is a truffle. Seriously fancy here, people.
1. For every quart of poaching water, you add 1/4 cup of white vinegar. This sounds like a lot, but it's not, and it's crucial, (you won't even taste it--promise). DON'T put any salt in your water, it will make the whites run.
2. If you're not using the poached eggs right away, have a bowl of iced salted water set up. When your eggs are doing cooking, transfer them into the cold water, which will stop the cooking and keep then moist.
3. Pre-crack your eggs into a teacup or other small vessel and use it to slip the egg into the water. This way it will go in as one whole blob, and you'll avoid having too much "spread" of the whites.
4. Use extremely fresh Grade A eggs--these are the firmest--again, less spread.
5. Use poaching water that is simmering, just on the verge of a boil. Barely simmering water isn't quite hot enough, and boiling water will disrupt the eggs.
6. Timing--Most people like eggs poached between 2 1/2 and 3 minutes. If you are poaching multiple eggs in the same pot, add 10 seconds per egg for each one in the pot (ex., if you're poaching 4 "2 1/2" minute eggs, total cooking time should be about 3 minutes, because you add 10 seconds for each additional egg). Being the yolk-hating weirdo that I am, I prefer my egg poached closer to 5 minutes, but if you follow the first guidelines--vinegar in the water, proper simmering temp, and pre-cracking your eggs--no matter how long you cook them, they should come out well.
If your whites do end up spreading a lot, it's totally acceptable to trim up the whites to make them look prettier--or not, whatevs. I won't judge if you like to quantity over looks.
So, yeah, that's a lot about eggs. I probably ate at least half a dozen today. Good thing I don't have a cholesterol problem (yet). Hopefully a few of these tricks will help you next time you need to cook an egg, and when I get some more specifics on the souffles, you will be the first to know, I promise!
Stay tuned for part 2 of BEST DAY EVER: Wine and Cheese pairing. Heaven!
Sunday, January 23, 2011
The Other No-Knead Bread (That I'm Totally Obsessed With)
By now the Jim Lahey, made famous by Mark Bittman/The New York Times "No-Knead Bread" is relatively well known, at least among those who like to bake. I ripped the recipe of of a newspaper years ago, when it was reprinted, but had never actually made it until a few weeks ago, at first because it requires a Dutch oven, and I didn't have one, and then because I guess I just forgot about it. But then for Christmas I received Jim Lahey's book My Bread which contains the now-famous recipe, along with multiple variations. I've now made it twice, and I've been pretty pleased with the results, although I have to say the crust gets SO CRISPY that it's actually difficult to slice! The inside is amazing and flavorful and full of those nice big holes that make it look fancy, but man, that crust is brutal. Plus, I have yet to make it without burning the top and bottom, which is frustrating. I'm not giving up on it just yet, but I needed to give it a rest...
And then, a NEW (very close to) no-knead bread developed by the geniuses at Cook's Illustrated, was brought to my attention by my friend Brad (formerly of TableVibrations, currently slave to medical residency). The recipe is excessively easy, and is made even easier because the awesome bread blog Breadtopia, has super videos illustrating each step, so it's virtually foolproof. And so fast. Honestly, pulling the flour out of the cupboard is the most time consuming part (along with waiting for my painfully slow oven to preheat...)

With good bread, it's all about the crust, the texture, and the flavor. So first, the crust: it's beautiful. Picture perfect. Appealingly golden hue, just crispy and crackly enough to make it feel special without taking the edge off your serrated knife. The texture: Moist, chewy, but with a tighter crumb (i.e., none of the big holes) than "artisan bread," but hey, nothing falls through that way, right? Flavor: excellent. This sounds weird, but it actually uses beer and vinegar to increase the complexity of the flavor, making it quite similar to sourdough bread in fact, without the hassle of sourdough starter. And while I was a little skeptical as I added the beer and vinegar, I have to say, it really adds something. Coming from a non-beer drinking family, my options for this step were Heineken and Smuttynose--we had a couple of bottles of each sitting in the pantry. I opted for the Smuttynose, because it just seemed weird to add Heineken into real food. I am happy with how it turned out, but I'm open to experimentation in the future.
In the end what really set this recipe apart for me was the fact that it didn't burn when I baked it, the fact that it retained its shape well, making for slices that are big enough (at least in the middle) for sandwiches, and the nicely balanced crust.


So, if you don't have a Dutch oven already, borrow one, or buy one (you'll be hooked, then you'll really want to have your own!) And, while we're talking about Dutch ovens, let me say that they come in a huge price range. A Le Creuset enameled cast iron Dutch oven could set you back a couple hundred dollars, depending on what size you buy. However, Martha Stewart's cookware line at Macy's has a nearly identical one for much less, and they go on sale fairly often, so if you time it right, you can snag one for $30 or $40. Lodge Logic is another brand that makes basic, non-enameled pots that are also right in that lower price range of $30 to $40, and can be found on Amazon or in some cookware stores. I personally like an enameled pot, because it's non reactive, so it can be used for cooking stews and other things with acidic ingredients that could react to cast iron, but that's a whole other discussion.... In any case, grab a Dutch oven, a food scale if you have one (this is SO FAST with a food scale!), stir, wait, knead a few times, wait some more, bake, and you will have amazing bread that you won't believe you made yourself!
Cook's Illustrated (Nearly) No-Knead Bread
Makes 1 perfect loaf
The white and wheat flour recipes are nearly identical, and the process for both is the same. To watch an awesome video that shows exactly how easy this bread is, click here.
White Flour Recipe:
* 3 cups (15 ounces) all purpose or bread flour
* 1/4 teaspoon instant or rapid-rise yeast
* 1 1/2 teaspoon salt
* 3/4 cup plus 2 Tbs. (7 ounces) water at room temperature
* 1/4 cup plus 2 Tbs. (3 ounces) mild flavored lager
* 1 Tablespoons white vinegar
* 1/4 teaspoon instant or rapid-rise yeast
* 1 1/2 teaspoon salt
* 3/4 cup plus 2 Tbs. (7 ounces) water at room temperature
* 1/4 cup plus 2 Tbs. (3 ounces) mild flavored lager
* 1 Tablespoons white vinegar
* Oil Spray, such as PAM
Whole Wheat Recipe:
* 2 cups (10 ounces) all purpose or bread flour
* 1 cup (5 ounces) whole wheat flour
* 1/4 teaspoon instant or rapid-rise yeast
* 1 1/2 teaspoon salt
* 2 Tablespoons honey or raw sugar, such as Sugar in the Raw
* 3/4 cup plus 2 Tablespoons (7 ounces) water at room temperature
* 1/4 cup plus 2 Tablespoons (3 ounces) mild flavored lager
* 1 Tablespoon white vinegar
* 1 cup (5 ounces) whole wheat flour
* 1/4 teaspoon instant or rapid-rise yeast
* 1 1/2 teaspoon salt
* 2 Tablespoons honey or raw sugar, such as Sugar in the Raw
* 3/4 cup plus 2 Tablespoons (7 ounces) water at room temperature
* 1/4 cup plus 2 Tablespoons (3 ounces) mild flavored lager
* 1 Tablespoon white vinegar
* Oil Spray, such as PAM
1. In a larger mixing bowl, combine the flour(s), yeast, salt, and sugar or honey (if making whole wheat)
2. Add in the water, beer, and vinegar, and stir until combined. This dough starts out on the dry side, so you might need to use your hand to finish incorporating the ingredients.
3. Put the bowl in a plastic bag or cover with plastic wrap, and put in a warm, draft free place for 8-18 hours. (If my kitchen is on the cold side, like, under 70 degrees, I put my dough in the oven with a bowl of hot water that I change a few times, just to create a slightly warmer, more humid environment. Another trick is to leave your oven light on and the door slightly ajar.
4. After 8-18 hours, turn out your dough onto a lightly floured surface. Roll the dough around gently to coat with flour so it doesn't stick, then knead it lightly about 10-15 times. If you're like me and actually like kneading dough, it will be hard to stop, but do, because this dough doesn't need (knead, ha!) your love. Gather the sides of your dough and pull it towards the center and pinch it together--this creates a nice, smooth exterior for your loaf.

5. Take a large piece of parchment paper and place it on a cookie sheet or in a skillet. Place the dough, pinched side down, on the parchment. Spray the top with your oil spray, and then re-cover it with the plastic wrap or plastic bag. Allow to rise for an additional 2 hours.
6. 1 1/2 hours into the second rise, preheat your oven to 500 degrees F, with your Dutch oven inside.
NOTE: If your Dutch oven has a separate handle that's attached with a screw, unscrew it and plug the hole with a bit of aluminum foil--I know that the Martha Stewart Dutch oven handle is only rated to 450 degrees, and Jim Lahey writes in My Bread that when his recipe was published in the NYTimes, cooking stores reported a rash of petty thefts involving Le Creuset handles, presumably to replace those ruined by the high heat required to bake this bread. Lodge Logic handles are made of metal, so they should be fine.

Right before you're ready to put your bread in the oven, sprinkle the loaf with flour, and using a razor or a sharp serrated knife, cut a slit about 1/2 inch deep across the middle of the loaf. When your oven reaches 500 degrees (or as hot as it gets), CAREFULLY pull out the Dutch oven. Make sure you have a potholder or a trivet down so you have somewhere to put your hot pot! Lower heat to 425 degrees F. Gently transfer your bread, on the parchment paper, into the Dutch oven.

Cover the pot, and then bake for 30 minutes with the lid on. Remove the lid and bake for an additional 10 minutes uncovered. (If you have an instant read thermometer, the inside of the loaf should be at least 200 degrees F, but if it's beautiful and golden, then you're probably set :)

Cover the pot, and then bake for 30 minutes with the lid on. Remove the lid and bake for an additional 10 minutes uncovered. (If you have an instant read thermometer, the inside of the loaf should be at least 200 degrees F, but if it's beautiful and golden, then you're probably set :)
Cool completely on a wire rack before slicing. Perfect for toast, sandwiches, and snacking.


Enjoy!!
Wednesday, January 19, 2011
New Chapter
Let it be known that today I hacked (several) halibut into chunks with a giant cleaver. Those of you who know me will realize that this is a fairly odd thing for me to be doing, since I don't like fish, and typically avoid it at all costs. BUT, what some of you might not know is that yesterday I started culinary school.... so I didn't really have a choice! (About the halibut, that is.) So, I embraced it a la Julia Child/Julie Powell (from Julie and Juila) and said "Don't be afraid!"
So, Culinary School, eh? I know most informal food bloggers like myself take pride in the fact that they are self taught and all that, which up until now, I have. But I had sort reached my limit on my old job (gardening), and so I decided to leave Nantucket and enroll in culinary school at Boston University. I don't really know what I'm going to do with my new skills, but it seemed like a fun thing to do.
So far we have made stocks: Beef/veal, chicken, vegetable, and fish (hence the halibut). I have to say, I have never bothered with making my own stock; I know that every credible chef says you should, and I acknowledge that, but a) I've never had a big enough pot, and b) it seems like a lot of effort and wasted ingredients (since you throw out the veggies used in the stock afterward). At least when I buy stock in a carton, I don't have to think about the waste. But, I will say this: our stocks were pretty darn good. I'd have to taste a carton stock and our stock side by side in order to see exactly HOW much better homemade is, but my initial reaction was that ours were probably better.
But anyway, I don't intend to change the focus of the blog too much, or get too fancy on you, but I do intend to keep you all updated on any new and interesting things that I learn. My gem for the day is don't handle halibut if you don't have to. Okay, okay, maybe I'm biased, but my hands still smell fishy, after washing them at least 10 times, and showering! Although it was kind of satisfying, except for how I ended up spraying myself with little bits of halibut... But for those of you who have told me that I should open my mind for the sake of my education, I will have you know that I even tasted the fish stock (by accident--I thought it was the chicken!) It was fishy....
And that's all I have to say about that today. But I didn't want to withhold my exciting news any longer!
Tomorrow: Soups! a.k.a., one of my all time favorite-est foods ever, so I think it will be a good day!
Subscribe to:
Posts (Atom)


